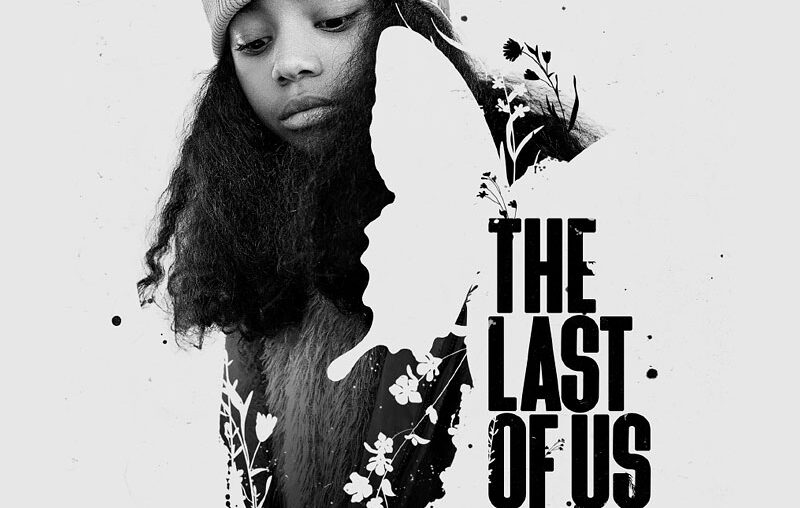
In this tutorial, let’s take a look at how to create negative space in design by recreating a promotional poster from TV show The Last of Us.
What you’ll need
What is negative space?
So what is negative space? Negative space, also called white space, is an empty area or shape around the main subject of a design. Negative space in design helps draw attention to the focal point and makes the design feel balanced and clear. In posters or other graphic design projects, using negative space can make a design stand out without needing a lot of elements.
Negative space fully embraces the “less is more” philosophy in design.
What is positive and negative space?
1. How to make a grungy paper background
Step 1
Create a Solid Color fill layer set to a light grey #e8e8e8 color. Name this layer “background.”
The canvas in this example is 1810 x 2681 px.
Step 2
Next, we’re going to create four layers that will sit at the top of our canvas, above all future layers.
First, create a Black & White Gradient Map adjustment layer.
Second, Duplicate the “background” Color Fill layer using Control/Command-J. Bring the duplicate above the Gradient Map layer.
Step 3
Third, drag and drop a grungy texture, like texture 7 from this vintage dust texture pack, onto the canvas. Place it above all current layers.
If the texture is not already a Smart Object, then Right-click > Convert to Smart Object. I highly suggest always working with Smart Objects.
Invert the texture using Control/Command-I. Bring the Opacity to 50% and set it to Darken.
Duplicate the texture, turn off the Invert effect, and change the layer mode to Lighten. Bring the Opacity to 100%.
Group all four layers, and name the group “Texture.”
This group of layers will add texture to our upcoming design, as well as turning it greyscale. They are optional. You can skip them or drag the group to the bottom of the layer stack if you’d prefer.


Step 4
Let’s add our subject below the “Texture” group, extracting her using Select Subject and a Layer Mask.


Step 5
Let’s prep our subject by increasing her brightness using Image > Adjustment > Curves. Add a small amount of noise (Filter > Noise > Add Noise set to 3%).
Next, go to Filter > Sharpen > Smart Sharpen and set the Amount to 162% and Radius to 0.3%. Finish the subject by turning the image into a Smart Object using Right-click > Convert to Smart Object.


2. How to make a custom Photoshop Brush
Step 1
Before we start creating our negative space, we’ll need to either download or create a butterfly Photoshop brush. I’ll be using this stock image to create a custom Photoshop brush.
Drop the butterfly into its own canvas. Use Object Select and a Layer Mask to remove the background. Use a Color Overlay layer style to turn the butterfly solid black.


Step 2
Turn the image into a brush by going to Edit > Define Brush Preset. Name the brush and press OK. The brush will now appear at the bottom of your Brushes panel.


3. How to use Photoshop brushes to create negative space
Step 1
Before adding the main negative space illustration, I find it helpful to carve out the general shape you want your subject to be in. Let’s start by adding a Layer Mask to the subject layer.
Use a hard round default Brush set to black to carve out the subject into a general design or shape.
This step is optional, and it might not be necessary depending on your design.


Step 2
Next, we can add our first negative space illustration using our butterfly brush set to black, stamping the shape onto the subject’s Layer Mask.


Step 3
From here, you want to use smaller stamp brushes to shape the edge of the subject. I used these flower stamp brushes along with these splatter brushes.
Set the Brush to black to create negative space, removing from the subject. Set the Brush to black to white to bring back parts of the subject.


Step 4
Now, we want to bring some of that flower and ink detail onto the canvas—this is called positive space. First, create and clip a New Layer into the subject using Clipping Masks.
Use a default soft round Brush to paint black around the edges of the subject, focusing on the edges where you want to bring the flower and ink detail outwards.


Step 5
We can then create a New Layer under our subject and stamp in more of the flower and splatter details.


4. How to add negative space to text
Step 1
You can add negative space to text using the same technique. This design is inspired by The Last of Us, so I recreated the show’s logo using the Devant Horgen font face, set to Bold and slightly squashed vertically.
This effect works with any font, but thicker fonts work best.


Step 2
Add a Layer Mask to the font, and just like with the subject layer, stamp some of the splatter and flower brushes onto the font using black to create negative space and texture in the text.


Step 3
Create a New Layer below the text, and use the same brushes set to black to add details coming off the text.


That’s how to use Photoshop brushes to create negative space!
We’ve learned what negative space is in art and how we can quickly apply it using brushes in Photoshop. You can create negative space using a variety of different shapes, text, and patterns. The key to using negative space is to focus on where you want the user to look, and then use negative space to draw the eye there. Just remember, less is often more.


Looking for more? Check out some of these other Photoshop tutorials:

