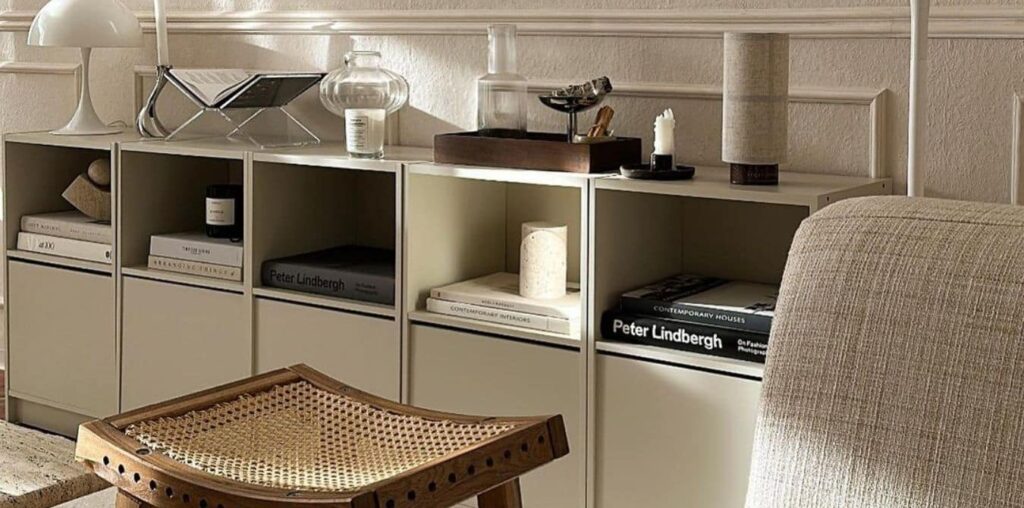
My search for the perfect sideboard has been going on for like ever. Like many home decor enthusiasts, I found myself caught between my champagne taste and lemonade budget – until I came across @interiorxlifestyle‘s IKEA hack.
She transformed the affordable IKEA GURSKEN nightstands into a sophisticated storage sideboard that may just be the thing I’m looking for. On its own, a single hacked GURSKEN might not amount to much. But when you place five of these hacked beauties in a row? Now that’s something spectacular. Repetition, my friend, is the key to creating drama.
“By repurposing the shelves as fronts and incorporating folding hinges, we’ve created a completely custom piece that serves our specific storage needs,” she explains.
Sideboard Cabinet With DIY Fold Down Doors
Materials:
The hack centers on the IKEA GURSKEN bedside table, which retails for just under $20. The project requires six to seven nightstands, depending on which method you use to make it.
The Process
The transformation involves several key steps, assuming you want to end up with 5 GURSKEN units with doors. Method 1 is easier but will cost you an additional GURSKEN unit, which I think is worth paying, for so much less work.
Method 1: Using 7 GURSKEN nightstands (no sawing!)

Assemble 5 GURSKEN nightstands as per instructions and set aside. The simplest approach to create door panels is to repurpose three of the horizontal panels of a GURSKEN unit as doors. By using two GURSKEN units, you can obtain a total of six panels.
Method 2: Using 6 GURSKEN nightstands

If you’re working with a budget, it’s essential to maximize the resources from a single GURSKEN unit. Here’s how.
Assemble 3 GURSKEN nightstands and set aside. Next, open the other two GURSKEN boxes (4th and 5th) and remove the bottom panels from both; these will be repurposed as doors.
Open the last (6th) GURSKEN box which is our sacrificial unit. Cut out two base panels from the side panels of this unit. Then, replace the two base panels from units 4 and 5 with your DIY panels.
To make the base panels, measure the original panel and transfer the measurements to the side panels of the GURSKEN unit. Then, carefully cut them up to make doors. For cleaner cuts, we recommend using a circular saw with a fine, carbide-tipped blade with a high tooth count.
Install the Doors
Then install the folding hinges with dampers to the GURSKEN unit and the doors. Attach UTRUSTA push openers to the side of the GURSKEN frame.
Align all five nightstands side by side, and voilà: you’ve created a gorgeous sideboard with open and closed storage. It looks luxe while remaining a budget-friendly hack.
TLDR? Check out @interiorxlifestyle’s Tiktok.
@interiorxlifestyle IKEA GURSKEN HACK 2 #makeover #transformation #transformacion #ikeahacks #ikeadiy #homedecor #diy #organization #wohnzimmer #wohnzimmerideen #apartmenttherapy #neutraldecor #budgetfriendly #interior #interiorinspiration #*düzen #schönerwohnen #ikeahacks #ikeahackers #diyideas #diyhomedecor #diy #diycrafts #fy #fyp ♬ ♡ ᶫᵒᵛᵉᵧₒᵤ ♡ – SoBerBoi
What are your thoughts on the IKEA GURSKEN sideboard hack? Share your views in the comments below.
And if you’ve got an IKEA hack of your own, do share it with us. Who knows? You might just see it featured in my next post.
Browse all IKEA sideboard hacks.


