This blog was inspired by Jeff Watkins’ series of blogs on UIButton. UIButton is a fundamental part of building interfaces on iOS. So much so, that it probably doesn’t get the love it deserves. But it’s also really powerful and customisable when used correctly.
Accessibility labels on iOS I feel are very similar. They’re fundamental to how accessibility works on iOS, yet I think they suffer from a few PR issues. Firstly, Apple has done such a good job with them that we often don’t give the humble accessibility label the consideration it deserves, instead relying on the Apple default behaviour. Secondly, they’re just some text, right? Who can get excited about just a boring old label? Well, I’m sure this won’t surprise you, but I can.
What’s an Accessibility Label?
When iOS presents your app’s interface to assistive technologies such as VoiceOver, Voice Control or Switch Control, it’s not passing your app’s screen, but a representation of the screen in what’s known as an accessibility tree, or accessible user interface as Apple often call it. Your customer’s chosen assistive technology will then handle how to present your interface in the way that best suits your customer. But assistive technologies need something to present, and their first port of call is your element’s accessibility label. VoiceOver will read it, braille displays will display it, and Voice Control will listen for it.
It Just Works
Here’s the first cool thing about accessibility labels on iOS. You don’t need to think about them. All of iOS’ inbuilt controls will work out what their accessibility label is from the content you’ve given it. Mostly this will be the control’s text value. Set this and you’re done.
I’m not letting you get out of this post that easily though. Because although this behaviour is great, don’t think this absolves you of your responsibility for accessibility in your app. Most of the time this behaviour is fine, but why settle for fine when you make your app’s experience awesome?
Setting Your Own
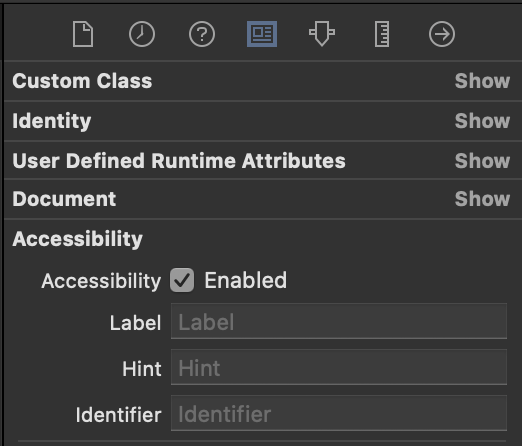
Sometimes you’ll need to specify an accessibility label yourself instead of relying on iOS to figure this out for you. Fortunately, doing that is just as simple as setting a text value. In code, you set the element’s accessibilityLabel property in UIKit, for SwiftUI use the .accessibility(label: ) modifier. And in Interface Builder look out for the Accessibility section in the Identity Inspector pane.
// Setting an accessibility label to 'My accessibility label' in UIKit
myButton.accessibilityLabel = "My accessibility label"
// Setting an accessibility label to 'My accessibility label' in SwiftUI
Button(action: {}) {
    Text("Button")
}.accessibility(label: Text("My accessibility label"))

It’s important to remember that assistive technologies will only pick up your accessibility label if the element is visible to them. Again, Apple has made some sensible default choices on their UI elements for this value, but if you need to set an element to be visible or hidden to accessibility use the Accessibility Enabled checkbox in the screenshot above. Or for UIKit, isAccessibilityElement and the .accessibility(hidden: ) modifier in SwiftUI, both of these take a Boolean argument.
// Hiding an image to assistive technologies in SwiftUI
Image("Image")
    .accessibility(hidden: true)
// Revealing an image to assistive technologies in UIKit
myImage.isAccessibilityElement = true
Next Up
The next blog in this series is When to use Accessibility Labels

