You do something long enough, you’ll eventually learn the little things you can do to help interesting stuff happen. One thing I have learned is this phrase:
“I’m a photographer. What can I do to help you?”
Just something as simple as that opens up all kinds of doors and possibilities. This week, it’s how I ended up shooting Mexican sodas on a table-top studio in my basement.
Be an Extrovert
At the end of this month, I’m off to Hanoi, Vietnam with a group of adventurous photographers. On our first day of classes, the first thing we’ll be talking about is how to put and keep a lot of lines in the water; how to make your own luck and greatly improve your chances of gaining access to a variety of interesting people and places.
Even if you are an introvert by nature, it really helps to learn to step into the mindset of an extrovert when it comes to photography. The more proactive you are with respect to meeting people, the more successful you’ll be at finding people and stories and things to shoot.
It’s like fishing. If you occasionally drop a line into the water, you’ll catch the occasional fish. If you drop a lot of lines in the water, every day, you’ll catch a lot of fish.
For a variety of reasons, lately I’ve been fishing in ethnic eateries in Howard County: meeting people, exposing myself to more friend-of-a-friend contacts and eating a lot of really good food.
Which is how I found myself at an excellent taco truck a 20-min scooter ride across town. And always being willing to start up a conversation is how I found out that Hilder, the proprietor, was looking to hop onto the Door Dash platform and needed some photos of the drinks he offers.
This is a quick and easy job for me. And if it helps him to grow his opportunities, I’m totally down to help. More in why, below.
But for the moment, I’d just found myself with a dozen Mexican sodas to photograph. So let’s do that now.
80:20 Pop
As I’ve said before, 80:20 is my sweet spot for photography. At the high end of each specialty — architecture, food, portraiture, interiors, etc. — there is work being done that is absolutely amazing. But it also very time and human resource intensive. I try to work in an area that is more efficient, and seeks to claim a reasonably big portion of the result with a small portion of the spent resources.
For instance, real food & bev photographers work in specifically equipped studios. And in the case of cold liquids, will use things like glycerin/water mixtures in spray bottles and syringes to create time-stable “condensation,” along with acrylic fake ice, etc. This ain’t that.
This is beverage photography using three speedlights, a small piece of white acrylic as a table top, some foam core and some printer paper.
In this case, our three speedlights are each tasked to a different part of our photo: one for the environment, one for the bottle and one for the liquid.
Step by Step
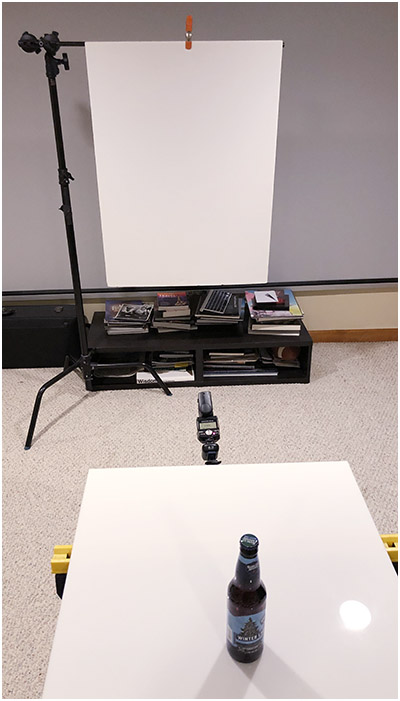
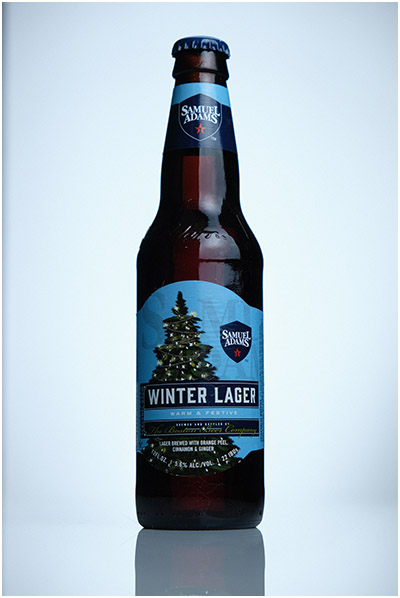
Here’s my starting setup. I’ve hung a pice of white foam core as my background, and I am shooting on a piece of white acrylic on two sawhorses as my table top.
I have placed a room-temperature beer from the pantry on the table as my subject. When it comes time to shoot the drinks, I’ll pull them from the fridge so they will condense and visually connote being cold.
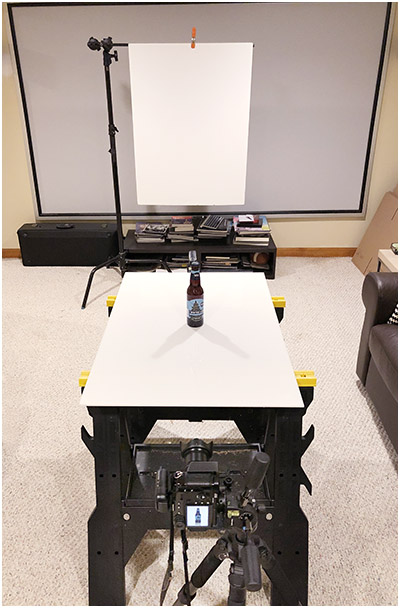
Pulling back a little, here is my shooting position. The camera is low to the table to capture the reflection. My ambient exposure is dropped down enough so where the scene will be rendered black without the addition of any flash. That’s the first thing you check, so you know the room lighting won’t influence the photo.
Okay, here’s our test shot right out of camera. It’s white-but-not-pure-white, with a nice gradient. The white-on-white horizon out of focus, so that line disappears. As seen above, there is one speedlight aimed from a low position at the foam core. So that’s my first flash, controlling the environment.
The bottle is dark. The reflection is strong — too strong in my opinion — but we’ll fix that in a moment. And the beer is just a shade north of opaque. We’ll need to fix that, too.
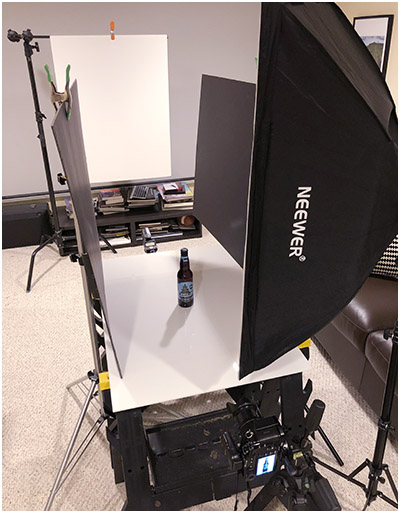
In the next setup photo, you can see I have added two black foam core flags on the sides. These will reflect black along the edges of the bottles. This is not so much needed for this deep amber beer bottle, but will come in handy with clear bottles holding clear liquids.
I have also placed my key light: a second speedlight in a cheap 2×3′ soft box. That lights up the front surface (i.e., label) of the bottle, as you can see here:
Notice something else? The reflection, formerly built on a silhouette, has been washed out somewhat by the white acrylic in the foreground now receiving some light. That looks better.
But the beer is still very dark. We want to not only fix this, but be able to internally control the tonal density and color of all of the different liquids we’ll be shooting. So let’s stick a flash back there.
Okay, let’s call this a partial success at best. It works, but is is too hard and too low. Maybe if I raise the flash (currently resting on the table on its side) I can hide it behind the label.
Meh, still not great. What I need is a light source that is diffused and fills the shape of the bottle. Let’s head to the printer for a piece of paper to cut into a custom scrim.
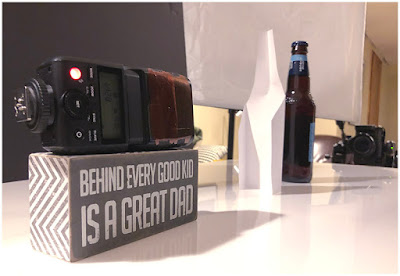
There it is from the back. As you can see, the flash (a skinny little Godox TT350F, designed to fit the form factor of Fuji X cameras) is resting on a Father’s Day paperweight. And in front of it is our custom diffuser/scrim.
That’s better. Not only is that filling the bottle much better, but now we can control the color and/or tonal density of the test beer separately from the background or the label.
Our three task-specific speedlights are now in place. These are all straight out of camera. But they are close enough to what I want so that individual adjustments will be very easy, both as I go and later in post.
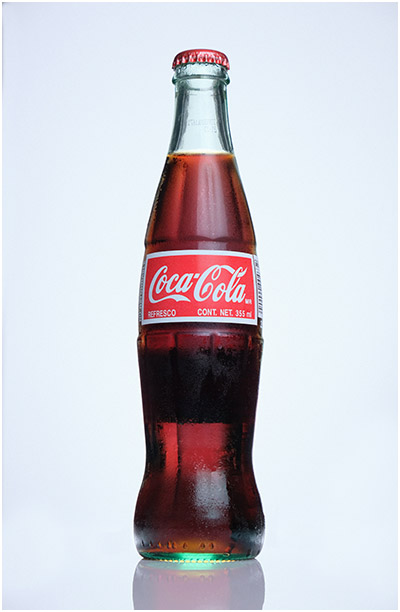
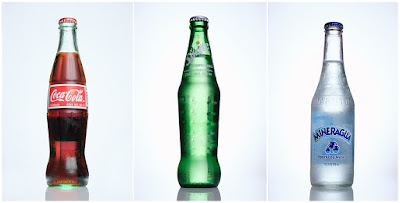
Now let’s kill the stunt double warm beer and bring in a cold Mexican Coke. (The difference being down there they still make Coca Cola with cane sugar instead of high-fructose corn syrup. And yes, they taste better.)
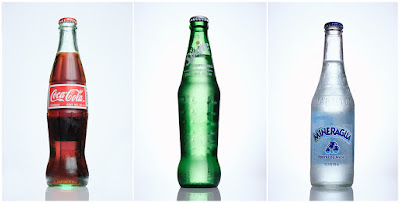
So these are edited photos now. You can see that the condensation (cold drink in a warm room) changes the surface quality of the bottle and visually, if subtly, connotes cold liquid. I’m not doing the whole glycerin thing, but keeping the drinks cold until you are ready to shoot them yields a realistic looking cold bottle.
The color and tone of the Coke itself is up to me, controllable by that little backlight. And for what it’s worth, all three of my flashes are running at very low power to do this. I want enough aperture to keep my bottles in focus, but not enough to render that horizon any sharper. So I’m hangout out at between f/5.6 and f/8, with my flash running between 1/128th and 1/32nd power.
For continuity in the final pictures, I am keeping the relationship between the camera’s exposure and the background light constant. My only relative adjustments are to the bottle light and the liquid light.
The back label on the Coke, optically shifted by both the glass and the liquid, is presenting as a dark area in the liquid. You could kill this by sanding off the back label paint — not something I am going to do for a job like this. But just so you know.
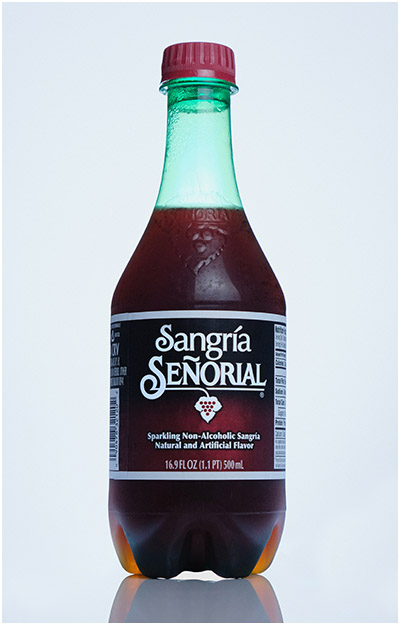
Okay this stuff: surprisingly good. It’s sangria-flavored, and non-alcoholic. Real cane sugar. But also dark burgundy, and in a complementary green bottle. (I would not have made that choice.) Remember, my flash controlling the liquid is going through two layers of what is effectively a green gel.
Original result: dark liquid mud.
So I added two stops of power and a CTB gel to the back/liquid light, which was a good guess as it rendered the liquid pretty lifelike. That’s what you see above.
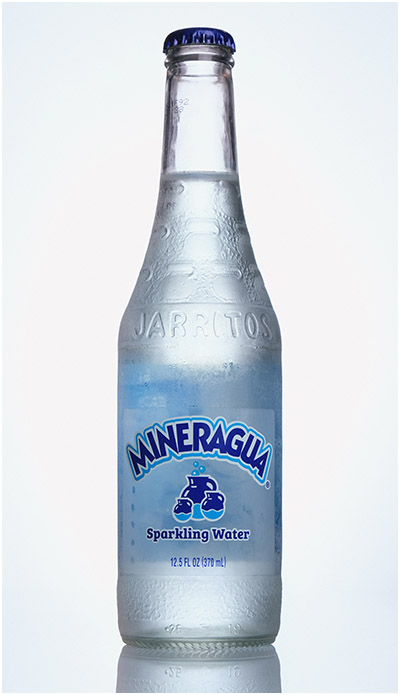
Lastly, something clear to see how the black boards help to define the edges of the bottle. At the edges, it’s literally a reflection of black.
If you’re wondering, I left the backlight scrim in for the clear liquid as well. The backlight power is just dialed way down. The water was darker and less appealing without it.
BTS/360
So, why am I scootering around the county, sampling global food and taking photos? After all, I’m not getting paid. This is something I am doing for fun, as could literally anyone who has been reading this site for any period of time.
Several reasons.
One, because it feeds the same curiosity that had me spend 20+ years and 10k+ assignments as a photojournalist. The stories I am hearing — especially from the first-generation immigrants who have brought their cuisine and culture to Howard County — are as interesting as the food is delicious.
Two, as a photographer I have resources. I have photography that I can spend however I want. These people are often beginning with scant resources and are making our county immeasurably better. I absolutely want to help foster and support that.
Three, which expands a bit on number two, is that my increasingly held premise is that there is a huge surplus of unused photography resources in the world that could be being used to raise awareness and help all kinds of people. It was at the heart of my mandate as a journalist. And I’m not really ready to give that up just because shooting editorial assignments full time is no longer my day job.
In fact, I would wager that the vast majority of the people reading this site has some measure of untapped time and photo resources that could be pointed in directions of the photographers’ choosing to help people and shape the way their neighbors perceive the local environment around them. Given this post will be read by a six-digit audience, that is not something I take lightly.
Lastly, these are first steps into a community. This is the stone in a larger “stone soup style” project that will seek to push back against the near daily fear mongering we seem to get about others and immigrants and infestations and “shit hole countries” — things I believe with all my heart not to be true, but rather levers to use fear as a means to an end.
I can’t fix that on a national scale. But I can start to create an obvious and concrete counter-narrative in my own community. So that’s my goal. And it is also something I’ll be blueprinting as I go for others who might want to do something similar.
__________
This article was published as an entry in Strobist Lighting Cookbook. New articles and how-to’s appear monthly. To receive notifications for new posts, you can follow via email or via Instagram.
