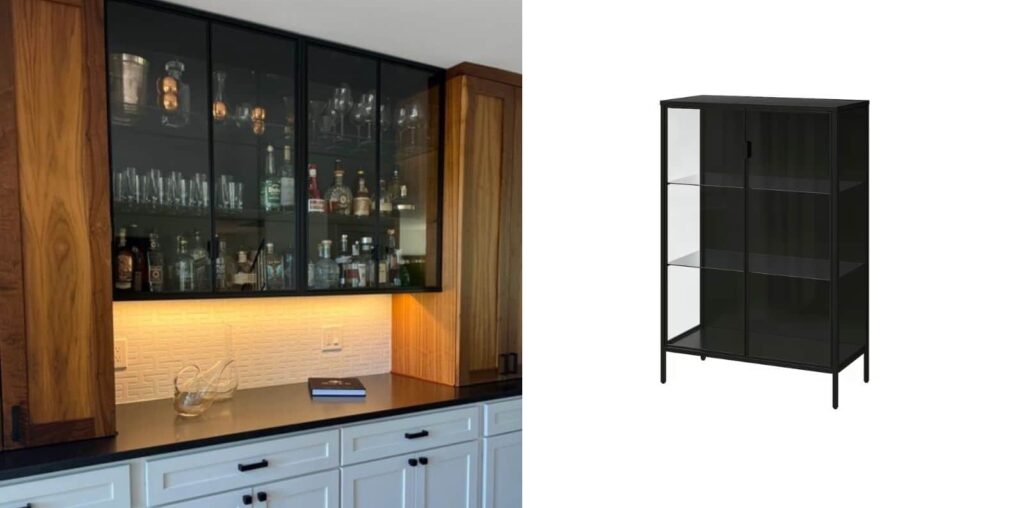
Picture this: sleek black metal glass cabinets in your kitchen. Pretty dreamy, right? These beauties have a way of making any kitchen look like it’s straight out of a design magazine. They’re stylish, they’re modern, and they’ve been on my wish list for years. But here’s the rub: they usually don’t come cheap.
Heather Ruth faced the same dilemma during her kitchen remodel, but instead of letting it remain a dream, she found an innovative solution with the IKEA RUDSTA cabinet. With a little IKEA hacking, Heather proved that these wallet-busting glass cabinets are within reach for everyone.
“When we remodeled our kitchen, I really wanted black metal glass front cabinets,” Heather explained. “Unfortunately, that type of cabinet was beyond our budget for the remodel. Then I found the IKEA RUDSTA, and it was a game changer.”
It’s A Metal Glass Cabinet (Just Remove The Legs)

Heather’s process began with assembling the RUDSTA cabinet according to the instructions. At this stage, she omitted the shelves. Next, she flipped the cabinet upside down, standing the cabinet on its head. She then used a saw to cut off the steel legs. The easiest way to cut off the metal legs would be to use an angle grinder. A hacksaw with a blade for metal may do the job too but it would be quite an arm workout.
Wall Mount The Beauty
With just a saw, drill, and some black screws, Heather and her family were able to hang up the RUDSTA cabinet in a single afternoon. “If you can’t find black screws, you can always paint the silver ones later,” she advised, offering a practical tip for those looking to replicate her project. Once the cabinet was securely mounted, she placed the shelves back inside, enjoying the convenience of built-in handles that aligned perfectly with the design.
To mount the cabinet to the wall, Heather offered some helpful tips:
- Enlist a friend to hold the cabinet in place while mounting.
- Drill through the back of the cabinet into the wall at each corner for secure attachment.
- For added stability, consider adding screws through the top of the cabinet into the ceiling.
- Always secure the cabinet to studs if you have drywalls.
Elevating the IKEA Glass Display Cabinet

Heather also suggests potential enhancements to the project. “There are so many fun things you could do to this project. I kept it simple and added peel-and-stick under-cabinet lights we got from our local hardware store,” she notes.
But why stop there? For those feeling extra crafty, why not take your cabinet from fab to absolutely fabulous? Try cutting plywood arches or intricate fretwork overlays and gluing them onto the glass panes to add a touch of glam.
Another popular way to upgrade the glass cabinet is to apply reeded glass peel and stick window film to the glass doors and sides. It’s like giving your cabinet a fancy frosted makeover that blurs out any clutter while still letting light through.
Will it hold up?

“My family uses these cabinets daily, and they have been holding up great for several years,” commenting on the durability of the hack.
Heather installed three RUDSTA cabinets in two different locations, creating a cohesive appearance throughout the space.
“I now have the beautiful black metal glass front cabinets I dreamed of in my new kitchen,” she beams, “I love the results, I hope you do too.”
You may also like this glass cabinet hack

The empty wall between the kitchen and dining area was very disturbing, even screaming at me to fill it with something. I came up with a hack on the IKEA MALSJÖ cabinet turning it into an elegant, tall glass cabinet on legs. Perfect!
Got an IKEA hack? Share it with us.


