There are two main schools of thought when it comes to lighting. One is to light your subject in a way that is not grounded in reality but merely looks cool. And the other is to use lighting to translate the way your eye sees light into a way that your camera can better understand it.
That latter choice is the option we’ll be exploring today in a walk-through of a sunset portrait of artist Wendy Ng for the Howard County Conservancy.
First Things First
The assignment is to photograph Wendy on the grounds of the conservancy. We are scheduled to meet at 7:30pm, about 30 minutes ahead of sunset. That should give us some nice transitional light to work with, and is a strategy I often employ.
Now that I am no longer shooting 2-3 assignments a day on deadline for the newspaper, I have the luxury of being able to pre-think most of my shoots. This mind shift offers many advantages. And in this particular case, it affords me the luxury of popping over to the conservancy to do a quick little pre-scout on the afternoon of the shoot.
__________
Wendy’s is one of a series of portraits I’m doing to commemorate the conservancy’s 30th anniversary. She has volunteered for many duties over the years, most recently helping to oversee program development.
That lack of subject specificity leaves us open to choose pretty much any environment on the grounds for her session. But at this point we are also seven portraits into the series, and trying not to duplicate our settings. So let’s walk around and take a look-see.
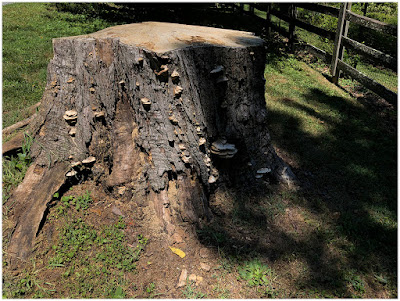
Okay, here’s a kinda nice stump. At about six feet across it’s bigger that it looks in this photo. It’s got a shade side and a sun side, which could be useful. It also speaks to time in service — if not continuity. Because its days as a tree are over.
But it is something, at least. So I’ll grab a scout pic with my phone, which you should always remember sees a tad wider than a 35mm full-frame wide angle lens.
Here’s an old outbuilding that has possibilities as either a textured 2-D backdrop or a 3-D space. It’ll also work in a pinch. But I am really trying to tie people to nature in this series.
Still, it’s good to have options.
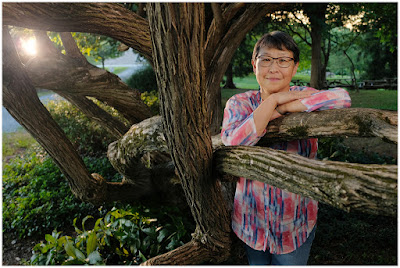
Oh, I like this. The branches on this tree have depth and shape — a sort of “river of time” feeling that fits very well with the theme of 30 years of service. I like this a lot.
The light is very mottled, though. My phone is doing a lot of computational heavy lifting to compress it into a jpeg. I won’t have that help with my Fuji X-Pro2 later. Plus our light will be very different in a few hours. The sun should be setting a little out of frame, at back camera left.
A plaque near the tree tells me it is a Bush Honeysuckle — lonicera Maackii.
First: bush? Looks more like a tree to me. But second, turns out this bush is native to Asia — as is my subject.
I‘ll take it. I can work with this.
The scouting trip is time well-spent. It gets the, “Arrrrrgh, what am I gonna do?” worries out of my head, and lets me concentrate on lighting my environment and interacting with my subject. Any pre-shoot stress is now melting away.
Sunset Bush Light
So here’s my final picture again. Let’s work backwards from here. The obvious position for the key light is gonna be upper camera right. So that is where my first light goes.
My key light is an Einstein e640 in a medium-sized soft box with a Rosco 09 warming gel attached near the flash tube:
But if we grab an available light shot, (i.e., no flash at all) you can see how dark it really is under the canopy. So we are obviously gonna need some other light in there:
I’ll need to illuminate the whole tree to make my key light more believable. So let’s move around to the left and set up a fill light:
To light the tree evenly, we’ll need to move the fill light pretty far back. So let’s walk across the gravel road at camera left and set up our second light — another e640 in a medium-sized soft box.
From this direction (and, just as important, from this distance) our fill light will paper over all of our shadow gaps from my key light as we work our way around toward the back of the frame.
Here’s what the fill light sees:
I am going to leave this light un-gelled, to give a little color variance as we wrap around those trunks and branches.
And while we’re here, a reminder of how helpful it is to view and photograph your subject from the position of each light. It immediately tells you what that light is doing. Plus, you can get your exposure/power setting very close before you head back to your shooting position.
Now, all we have left is the setting sun in background to open everything up.
Except that’s not the sun. As it turns out, the setting sun was occluded by a nearby barn when viewed from our shooting position.
So our stand-in for the sun is a third e640 with a zoom reflector and a full tungsten (CTO) gel, positioned back down the road a bit. This extra distance helps to backlight the foliage and grasses in the background, to further sell the idea that our “sun” is 93,000,000 miles away.
If I open up the exposure on the available light BTS shot above, you can just see this light back through the branches:
Okay, show of hands: who had our sun as an artificial light from the get-go?
I wouldn’t blame you if you missed it. That light is pretty believable as the sun, because it is serving as the visual anchor for the whole environment.
Remember how dark our normally exposed ambient BTS pic is? In that environment (with either a real or fake setting sun) the “sun” creates the necessity of the key light. And the shadow gaps created by that cross-light sandwich create the need for the camera-left fill.
From an overhead view, the fill light is set pretty close to a perpendicular angle:
(Correction: the “sunset” light is actually even further back than pictured in this mistaken overhead — it’s further back on the other side of the road.)
The gels on the lights (front-to-back: R09, neutral and tungsten) establish some chromatic complexity throughout the lit environment. There’s even some green happening in there — reflections of the strobe’s light off of the lower foliage — that I also like.
So while the relationship of the color of light coming from the three flashes is set, I can globally adjust the entire photo to make the flash vs ambient balance feel more realistic. Which is exactly what I did — little to the cooler side.
One last thing. Since all of my near environment is flash-lit, I can open or close the background exposure just by varying my shutter speed. In the end, I was down to 1/30th of a second (at f/3.6 at ISO 400) for the final photo.
Looking at the seemingly embedded sun, I would likely never guess this photo was shot at 1/30th. But sticking that flash in back freezes the “sunset” in time and affords me a longer shooting window as a bonus.
And the resulting final photo feels natural — and less lit — than it would have had I used only one light and was racing against the sun.


