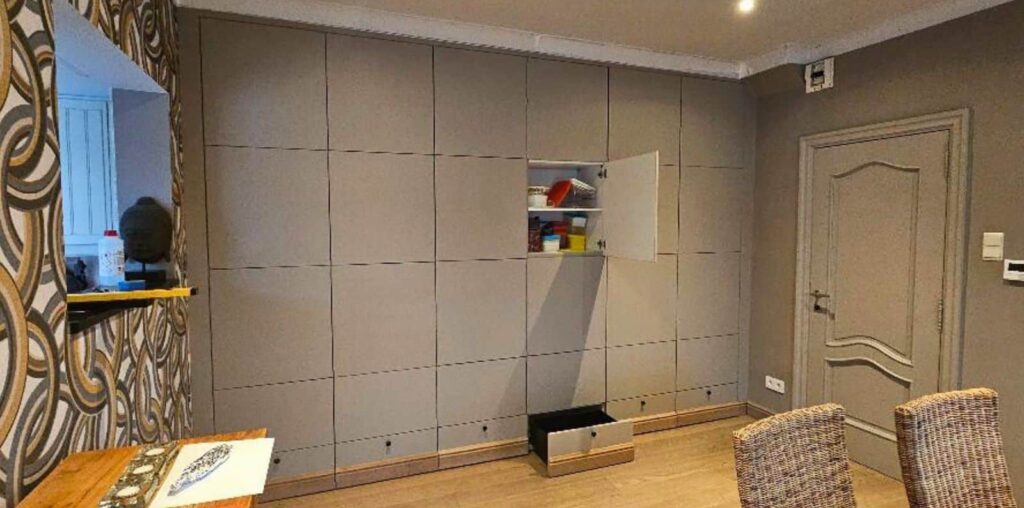
IKEA hacker Uwe Christiaens is back with a fresh twist on his popular ‘BESTÅ wall’ hack. After receiving feedback on his previous creation, Uwe decided to refine his design for a more seamless integration with his home.
“I had comments about the finish, colors, and how it did not match the rest of the interior,” Uwe explains. “So I decided to take it up a notch.”
For the BESTÅ wall 2.0, Uwe aimed to blend the IKEA BESTÅ cabinets with his existing décor by painting them to match his walls. But as any seasoned DIYer knows, the devil is in the details.
The IKEA Wall Storage Hack
Pictured above is the old BESTÅ wall hack. Since the IKEA BESTÅ cabinet frames were already installed, Uwe was able to skip the assembly step. He simply removed the old TOFTA doors and drawer fronts.
If you’re starting from scratch, use the BESTÅ planner to plan the best configuration for your wall space. Once you have all the cabinets, assemble them and install them from floor to ceiling according to your plan and IKEA assembly instructions.
The Painting Process

Uwe’s first challenge was finding the right adhesion primer to grip the lacquered SELSVIKEN doors. “You definitely need a good adhesion primer,” he emphasizes, recommending BOSS, a brand from Belgium. Other IKEA hackers have also achieved good results using Rust-Oleum’s Zinsser BIN Shellac Primer as a base.
“After priming, apply two coats of paint. Sounds simple, right?” Uwe quips, hinting at the complexity of the process in real life.
The painting process required thorough attention to achieve a smooth, durable finish:
- First, he degreased the doors with isopropyl alcohol.
- Then, lightly sanded the doors. (Uwe recommends Scotch Brite).
- Removed dust and did a second round of degreasing with isopropyl alcohol.
- Next, he applied the primer and allowed for proper drying time (following manufacturer’s instructions).
- Finally, applied two layers of paint (respecting drying times and temperature between coats).
He also took care to paint the front edge of all cabinet frames in the same color as the doors, minimizing any color differences when the doors are closed.
Adding Molding and Trim

To achieve a built-in look, Uwe tackled the moldings and plinths next. This involved removing the originals, purchasing new ones, and then carefully mitre-cut them to fit. The lower drawers presented a particular challenge.
“I had to cut the plinth to the right length to fit each drawer and shave half an inch off the bottom so that when I would open the drawer, the plinth would clear the floor,” Uwe explains. “I underestimated the amount of work involved in this project. I mean the IKEA wall storage consists of a total of 24 doors and 6 drawers — that’s a lot of work.”
Despite the labor-intensive process, Uwe is pleased with the final result. “I think this is a significant upgrade to the original storage wall I installed,” he remarks with satisfaction.
Attention To Details

Uwe also replaced the drawer handles with sleek black ones sourced from TEMU.
To secure the plinths, he used a high-tack glue from Soudal, designed specifically for moldings and plinths. Uwe also filled the gaps between cabinets using caulk for a smoother finish.
The Investment

In total, Uwe spent around €220 ($245) on paint, glue, and materials to fill holes in the drywall, as well as new moldings.
Hacking Evolves Over Time

IKEA hacks, like our homes and lives, can evolve. If you’re no longer satisfied with a previous hack, don’t hesitate to roll up your sleeves and adapt it to fit your current lifestyle and home decor. The beauty of DIY is that nothing is set in stone – or in this case, in lacquer. So feel free to reimagine, switch out, and breathe new life into your space whenever inspiration strikes.
View Uwe’s previous IKEA BESTÅ Wall Hack and BESTÅ media unit hack to hide all the clutter.
Process photos of the IKEA Wall Storage Hack
Did you update an old IKEA hack? Share it with us.


