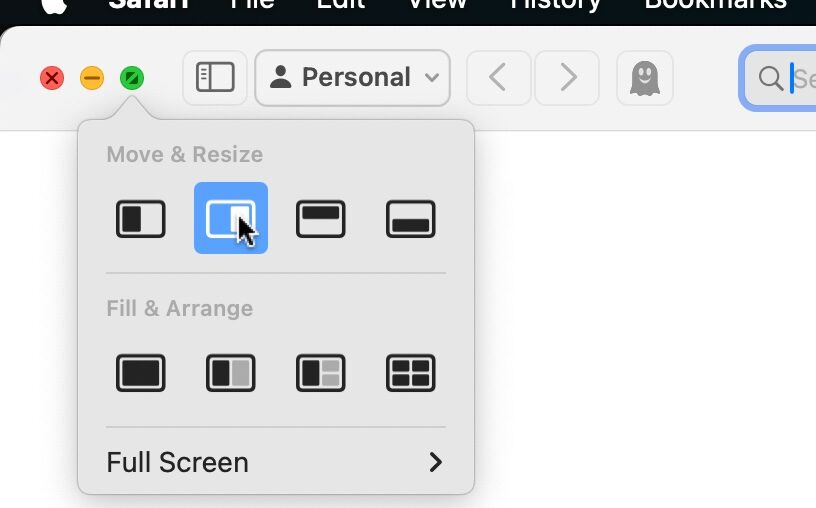

Window Tiling on the Mac has gotten much better since MacOS Sequoia, and it’s now easier than ever to arrange and tile windows on your screen.
With Window Tiling, you can split windows, send windows to the left or right, quarter windows on your display, and much more. There are multiple different ways to access the new and improved Window Tiling features on the Mac, so familiarize yourself with them and you’ll be a master in no time.
How to Use Window Tiling on Mac
One of the easiest ways to use Window Tiling is from the green resize window button on a Mac window:
- Hover over the green window button on a window you wish to tile
- Select the tiling option you wish to use: left, right, top, bottom. Or, select full screen, half screen, quarters
- The window will instantly resize and move to the intended location
- Repeat with additional windows to tile and arrange to your preferences


You will quickly have your windows arranged however you’d like. You can arrange multiple different app windows together, or windows from the same app, it doesn’t matter.
Another option is to hold down the OPTION/ALT key while you’re dragging windows around on the Mac display to the left, right, top, and bottom, to automatically tile them. If you don’t like this feature, which is enabled by default, you can toggle it off in Settings.
Additionally, you can also access Window Tiling options from just about any Mac app by going to the “Window” menu and then going to “Move & Resize” and selecting where or how you’d like to tile windows from there.
Customizing Window Tiling Settings & Options on Mac
There are various settings you can adjust to customize Window Tiling to your preferences. Head over to Apple menu > System Settings > Desktop & Dock > to locate the following Window Tilling settings options that you can toggle off or on:
- Drag windows to screen edges to tile
- Drag windows to menu bar to fill screen
- Hold Option/ALT key while dragging windows to tile
- Tiled windows have margins
If you don’t want a small gap between your tiled windows, toggle off the last setting. The other settings are fairly self explanatory as well.


Window Tiling is one of those features that is useful enough that it might drive some users to update to MacOS Sequoia, so if you haven’t installed Sequoia yet but you’ve been on the fence, perhaps this will incentivize you to upgrade to MacOS 15 or later.
What do you think of the new Window Tiling features on MacOS Sequoia? Do you use it often? What’s your preferred method of accessing the feature?

