In a few recent projects, I’ve needed to utilise Google Maps within environments utilising Jetpack Compose. In the early days of Compose this felt light a sought-after piece of functionality – even though it is still being built on, it now seems to be in a place where I can confidently use it. In this series of blog posts, I’ll share how we can use the different parts of the Compose mapping package.
Now that we have the basics down from a previous post, we’re going to dive into the Polyline composable and learn how we can draw coordinate-based lines on our map.
Looking to learn more Jetpack Compose? The video course for Practical Jetpack Compose is now available 🚀
The Polyline Composable
In the previous post we looked at the Circle composable, which is used to draw circles and indicate contextual information on maps. When it comes to the Polyline composable, we can use this to display information on how locations connect within a map, which would be routes of some kind. The Polyline is a simple composable, taking a list of LatLng instance and drawing a line to connect the coordinates. It’s important to note the @GoogleMapComposable annotation – we covered in the previous post that the GoogleMap composable only supports children using this annotation.
@Composable
@GoogleMapComposable
public fun Polyline(
    points: List<LatLng>,
    clickable: Boolean = false,
    color: Color = Color.Black,
    endCap: Cap = ButtCap(),
    geodesic: Boolean = false,
    jointType: Int = JointType.DEFAULT,
    pattern: List<PatternItem>? = null,
    startCap: Cap = ButtCap(),
    tag: Any? = null,
    visible: Boolean = true,
    width: Float = 10f,
    zIndex: Float = 0f,
    onClick: (Polyline) -> Unit = {}
)
As we can see from this composable, there is a collection of arguments that allow us to customise our Polyline. To start with, there is the required points argument – this must be provided so that a line can be drawn between the provided coordinates. To be able to satisfy this argument, let’s start by defining a collection of LatLng references.
val routeCoordinates = listOf(
    LatLng(53.3811, -1.4701),
    LatLng(52.5868, -2.5257),
    LatLng(51.8994, -2.0783),
    LatLng(51.4551, -0.9787)
)
With this in place, we can go ahead and compose a Polyline inside of our GoogleMap instance.
Polyline(
    points = routeCoordinates
)
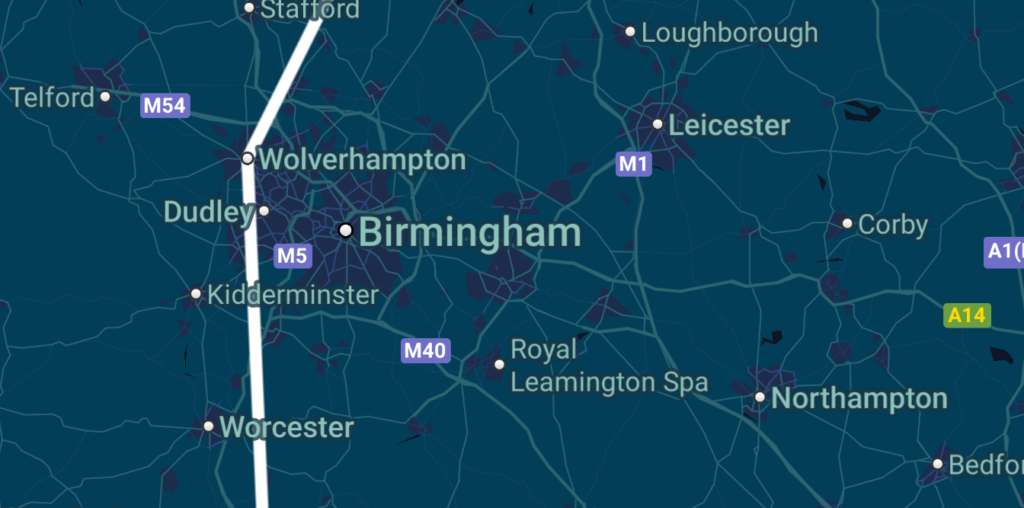
With this in place, we’ll now be able to see a Polyline displayed on our map. Using the provided coordinates, a line is being used to connect these four different points.

By default, the color argument of the Polyline will default to Black when not provided. For the current theme of our map, this isn’t very visible. To improve things here, we’ll go ahead and override this color.
Polyline(
    points = routeCoordinates,
    color = Color.White
)
With this in place, we can now see that our line has greater visibility on our map.

If we wish to increase this visibility further, we can utilise the width argument to increase the width use when drawing the line on the map. In some cases where there is a lot of information or existing drawing details on a map, a thicker line can help to increase the visibility of the drawn line.
Polyline(
    points = routeCoordinates,
    color = Color.White,
    width = 16f
)
In some cases, the default drawing style of the line may not match our requirements. When it comes to how this line is represented on our map, we can use the pattern argument to define how the line is to be drawn. This is done by providing a list of PatternItem instances – so for example, we can draw a dashed line by using the following code:
Polyline(
    points = routeCoordinates,
    color = Color.White,
    width = 16f,
    pattern = listOf(
        Dash(15f),
        Gap(15f)
    )
)
Now that we have this pattern defined, we can see the pattern being applied when drawing the Polyline on our map. When connecting locations on a map, differently styled lines can help to portray different information such as route availability or preference.

Aside from controlling the visual constraints of our Polyline, we can also listen for click events on the line – this could be useful in case where we want to show further information for the clicked line. To enable this we need to enable the interaction by using the clickable argument, followed by handling the click interaction via the onClick lambda.
Polyline(
    ...,
    clickable = true,
    onClick = { line ->
        // handle click event
    }
)
In this blog post we’ve taken a quick look at the Polyline composable, a simple composable which is can be used to draw coordinate-based lines on a map. We’ve not only learnt how we can style this composable to adhere to the required look/feel of our application, but also how we can enable click events to show further context on the selected line. In the following posts, we’ll continue to look at customising our map further through other composables that are supported through the GoogleMapComposable content scope.

