Reels are a key player in engaging audiences and boosting your online presence. Planning your content in advance, not only saves time, but also ensures your feed stays organized and impactful.
But, can you schedule Instagram Reels ahead of time? Yes, you can schedule Reels for free natively in the app, or with the help of a third-party scheduling tool like Planable, which offers direct publishing posts, Reels, and Stories.
Contents:
How to schedule Reels on Instagram for free
- natively via the Instagram app (only available for mobile app, not on desktop)
- via Meta Business Suite, where you can schedule Instagram and Facebook content
- via a third-party app like Planable, the social media tool that allows you to schedule posts for 9 social media platforms. You can schedule IG Reels within Planable just like you’d schedule Instagram posts.
I love scheduling reels for a longer period of time. Not only does it keeps me organized, but I make sure the content plan and strategy are followed.
– Andreea Coroian, Social media manager and content creator
Schedule Instagram Reels natively, on mobile
If you only schedule Reels once in a while, you can use the built-in Instagram scheduler. When creating new content, go to Advanced settings and select a date up to 75 days in advance. Here’s how:
- In the Instagram app, tap the + sign at the bottom and select Reel.
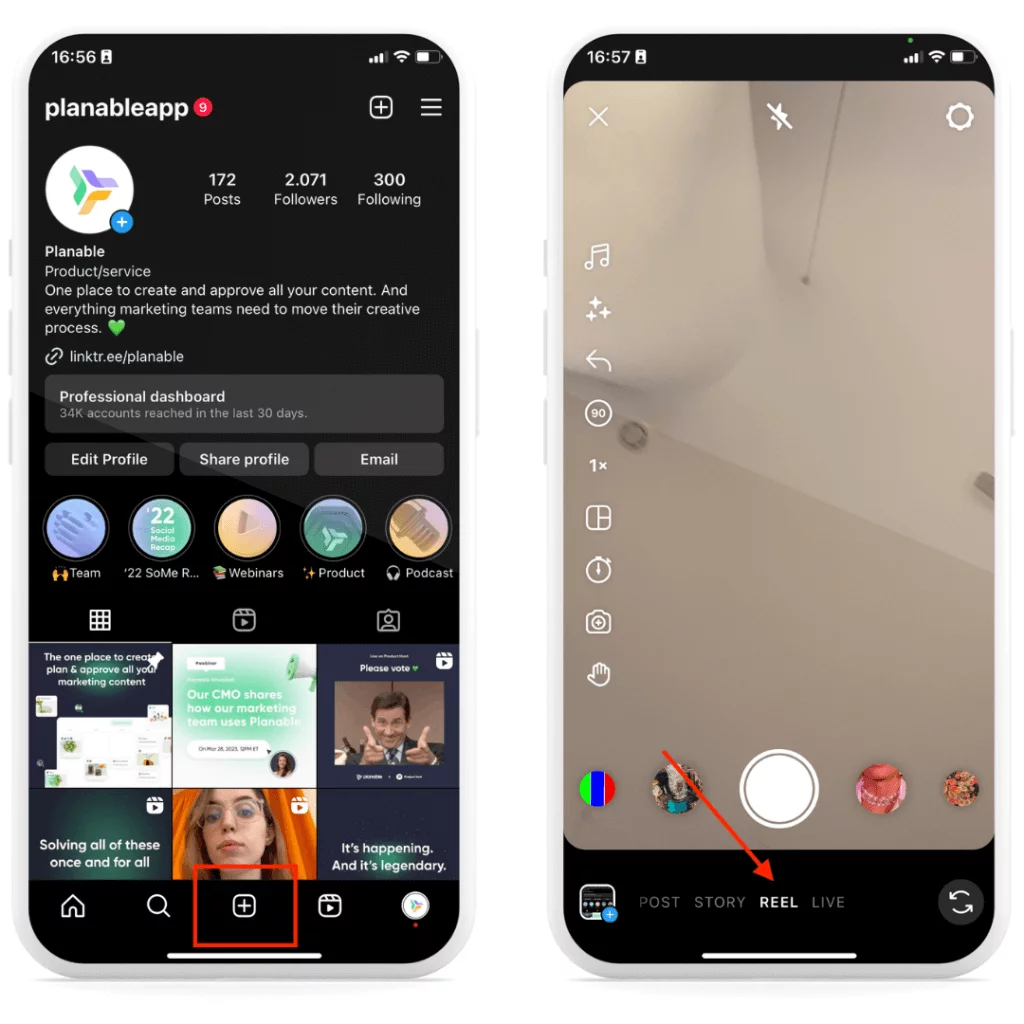

- Add photos or videos, a caption, and filters.
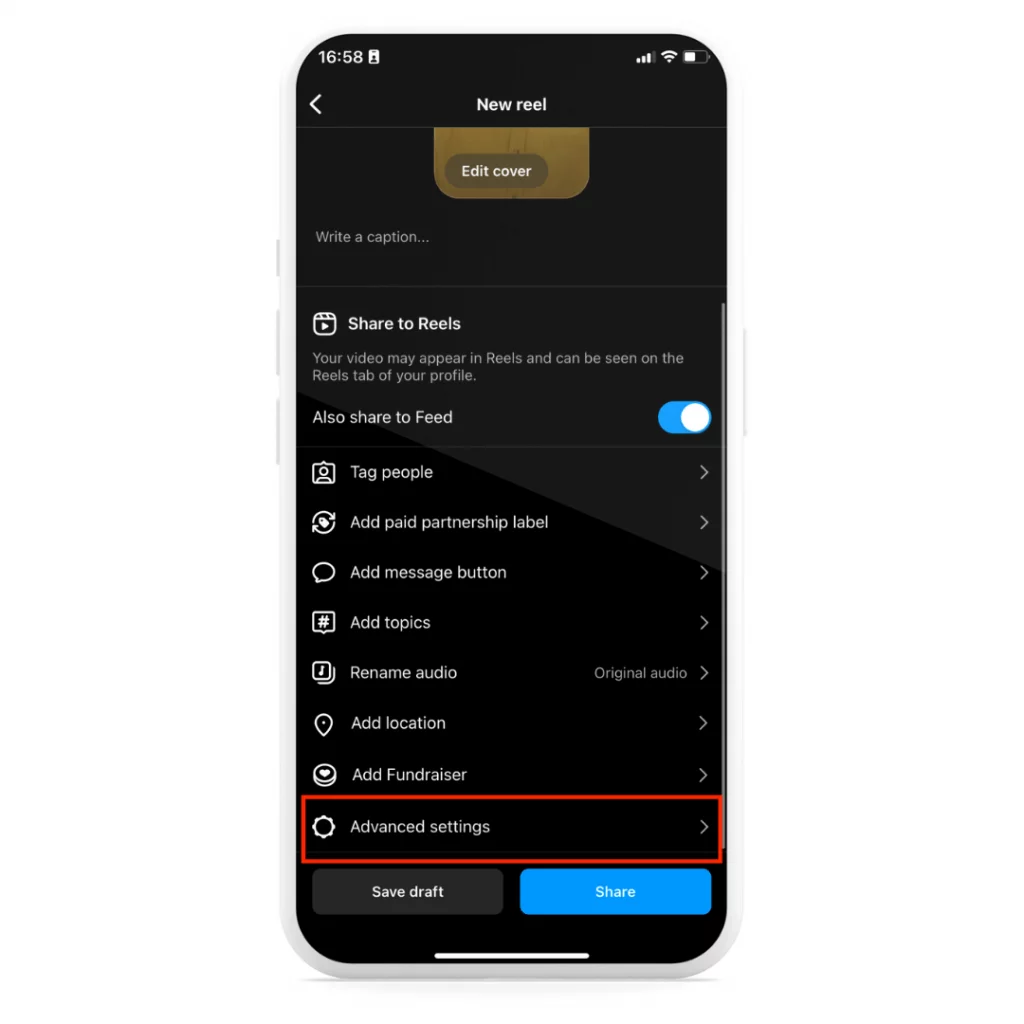
- Tap Advanced Settings.

- Tap Schedule and select your date and time.
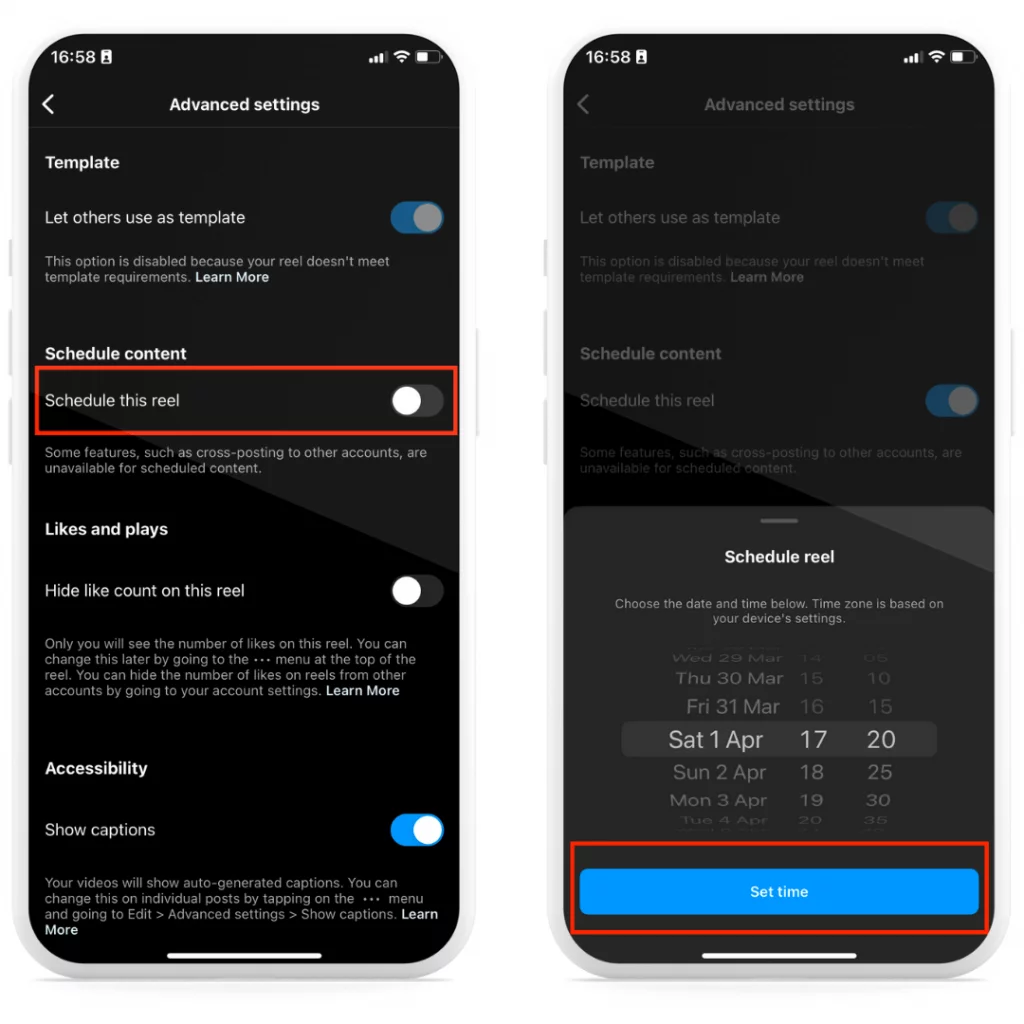

- Tap Done and return to the Reel editing.
- Tap Schedule to schedule the Reel.
Can you edit natively scheduled Reels?
Yes! If you’ve had a change of heart, you can reschedule or delete a scheduled Reel following these steps:
- On your Instagram profile, tap the Menu in the right side corner.
- Tap Scheduled Content.
- Tap the three dots on the Reel you want to edit.
- Tap Edit post to change your caption and location.
- Tap Reschedule to change your publication date and time.
- Tap Share now to make it live or Delete to remove it.
*You can only modify the caption, location, date, and time. Alternatively, you can publish it instantly or delete it if you wish.
Note: Creator Studio officially migrated with all its content creation features to Meta Business Suite.
If you’re looking for another way to schedule reels natively on Instagram without third-party apps, here’s how you can do that in Meta Business Suite:
1. From your business Facebook page, click on Business dashboard.
2. From your Meta Business Suite homepage, select Create Reel. 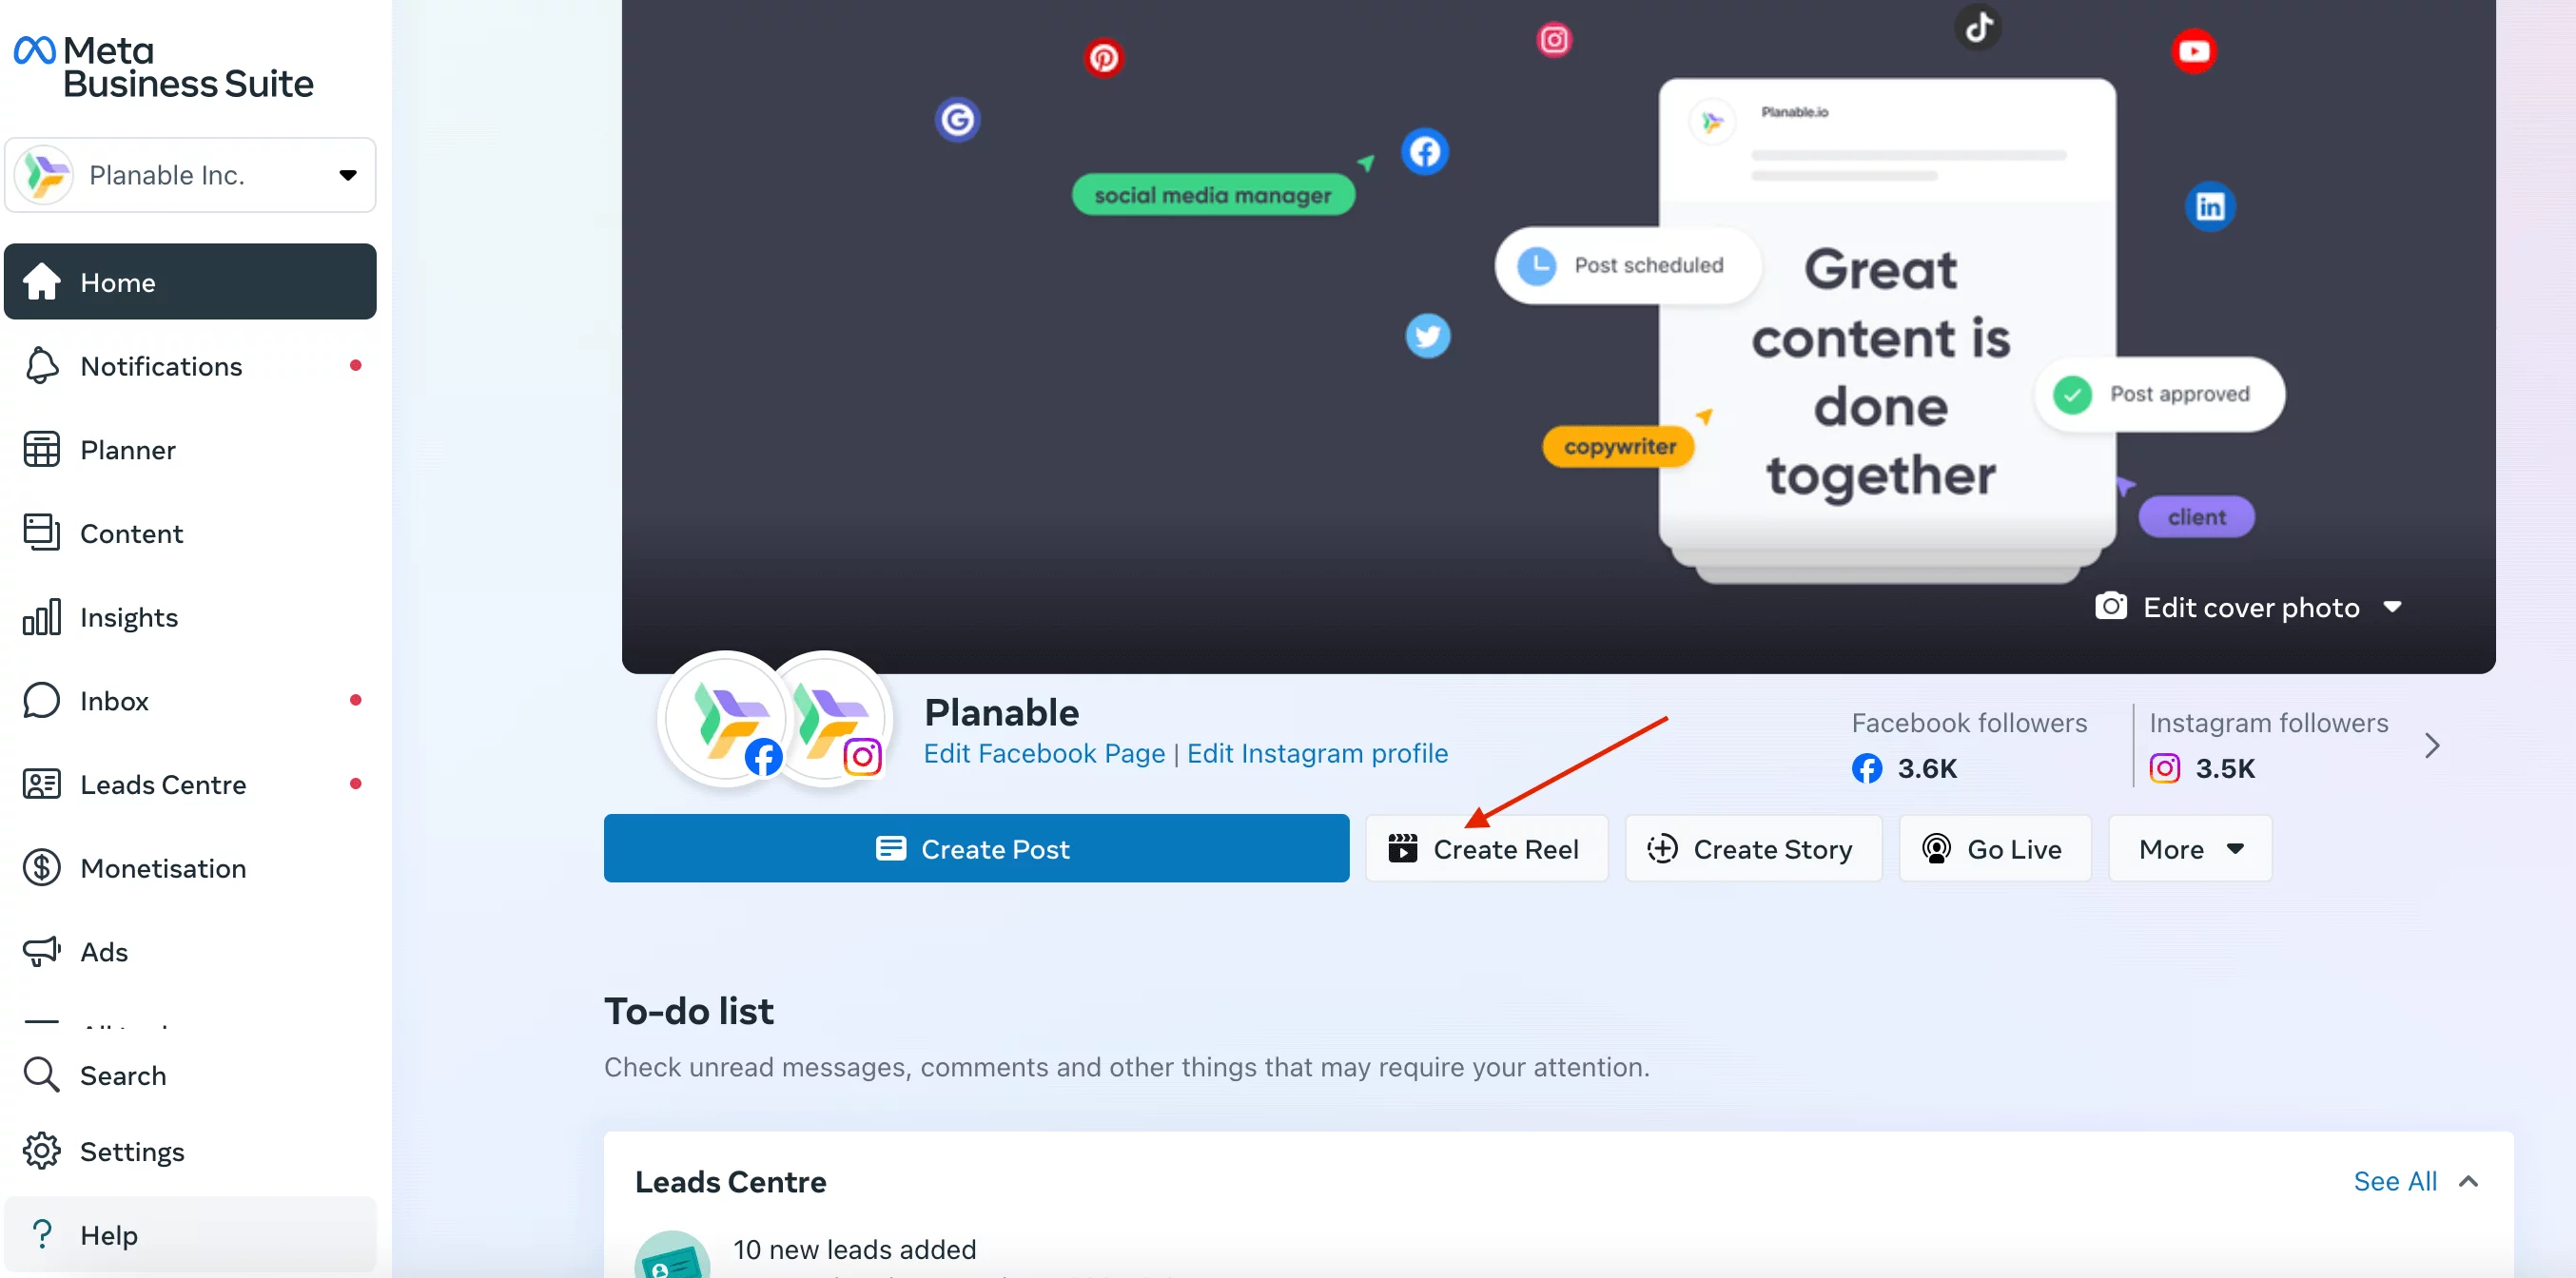

3. Select the page you want to share it to (you can select both Instagram and Facebook.
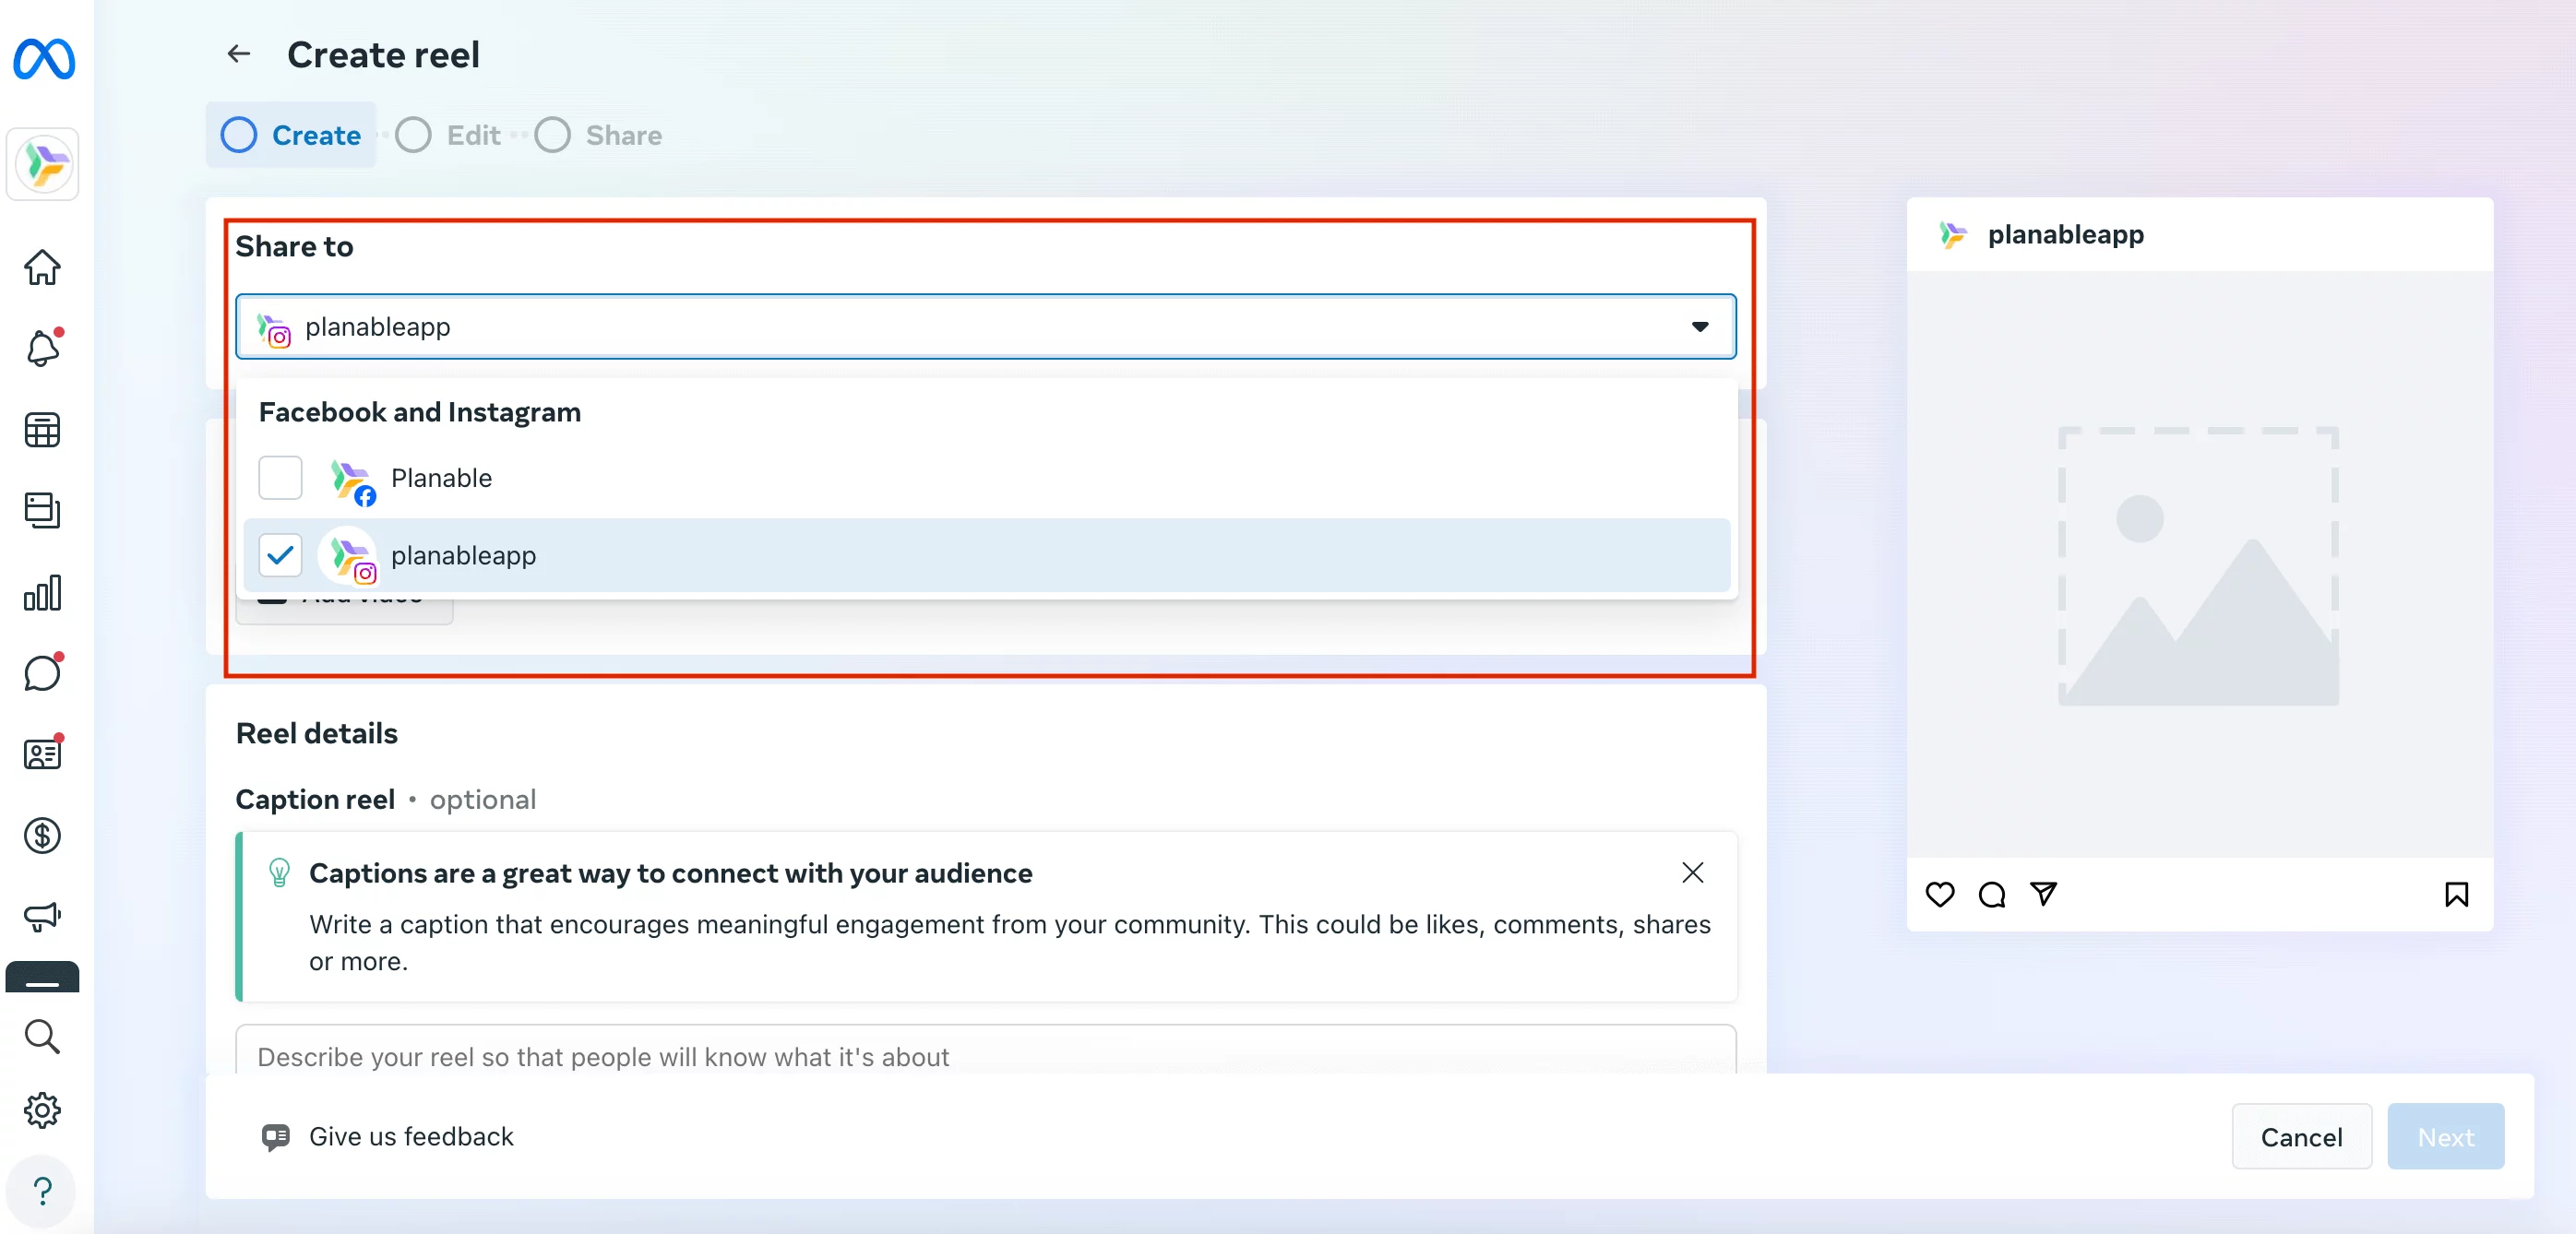

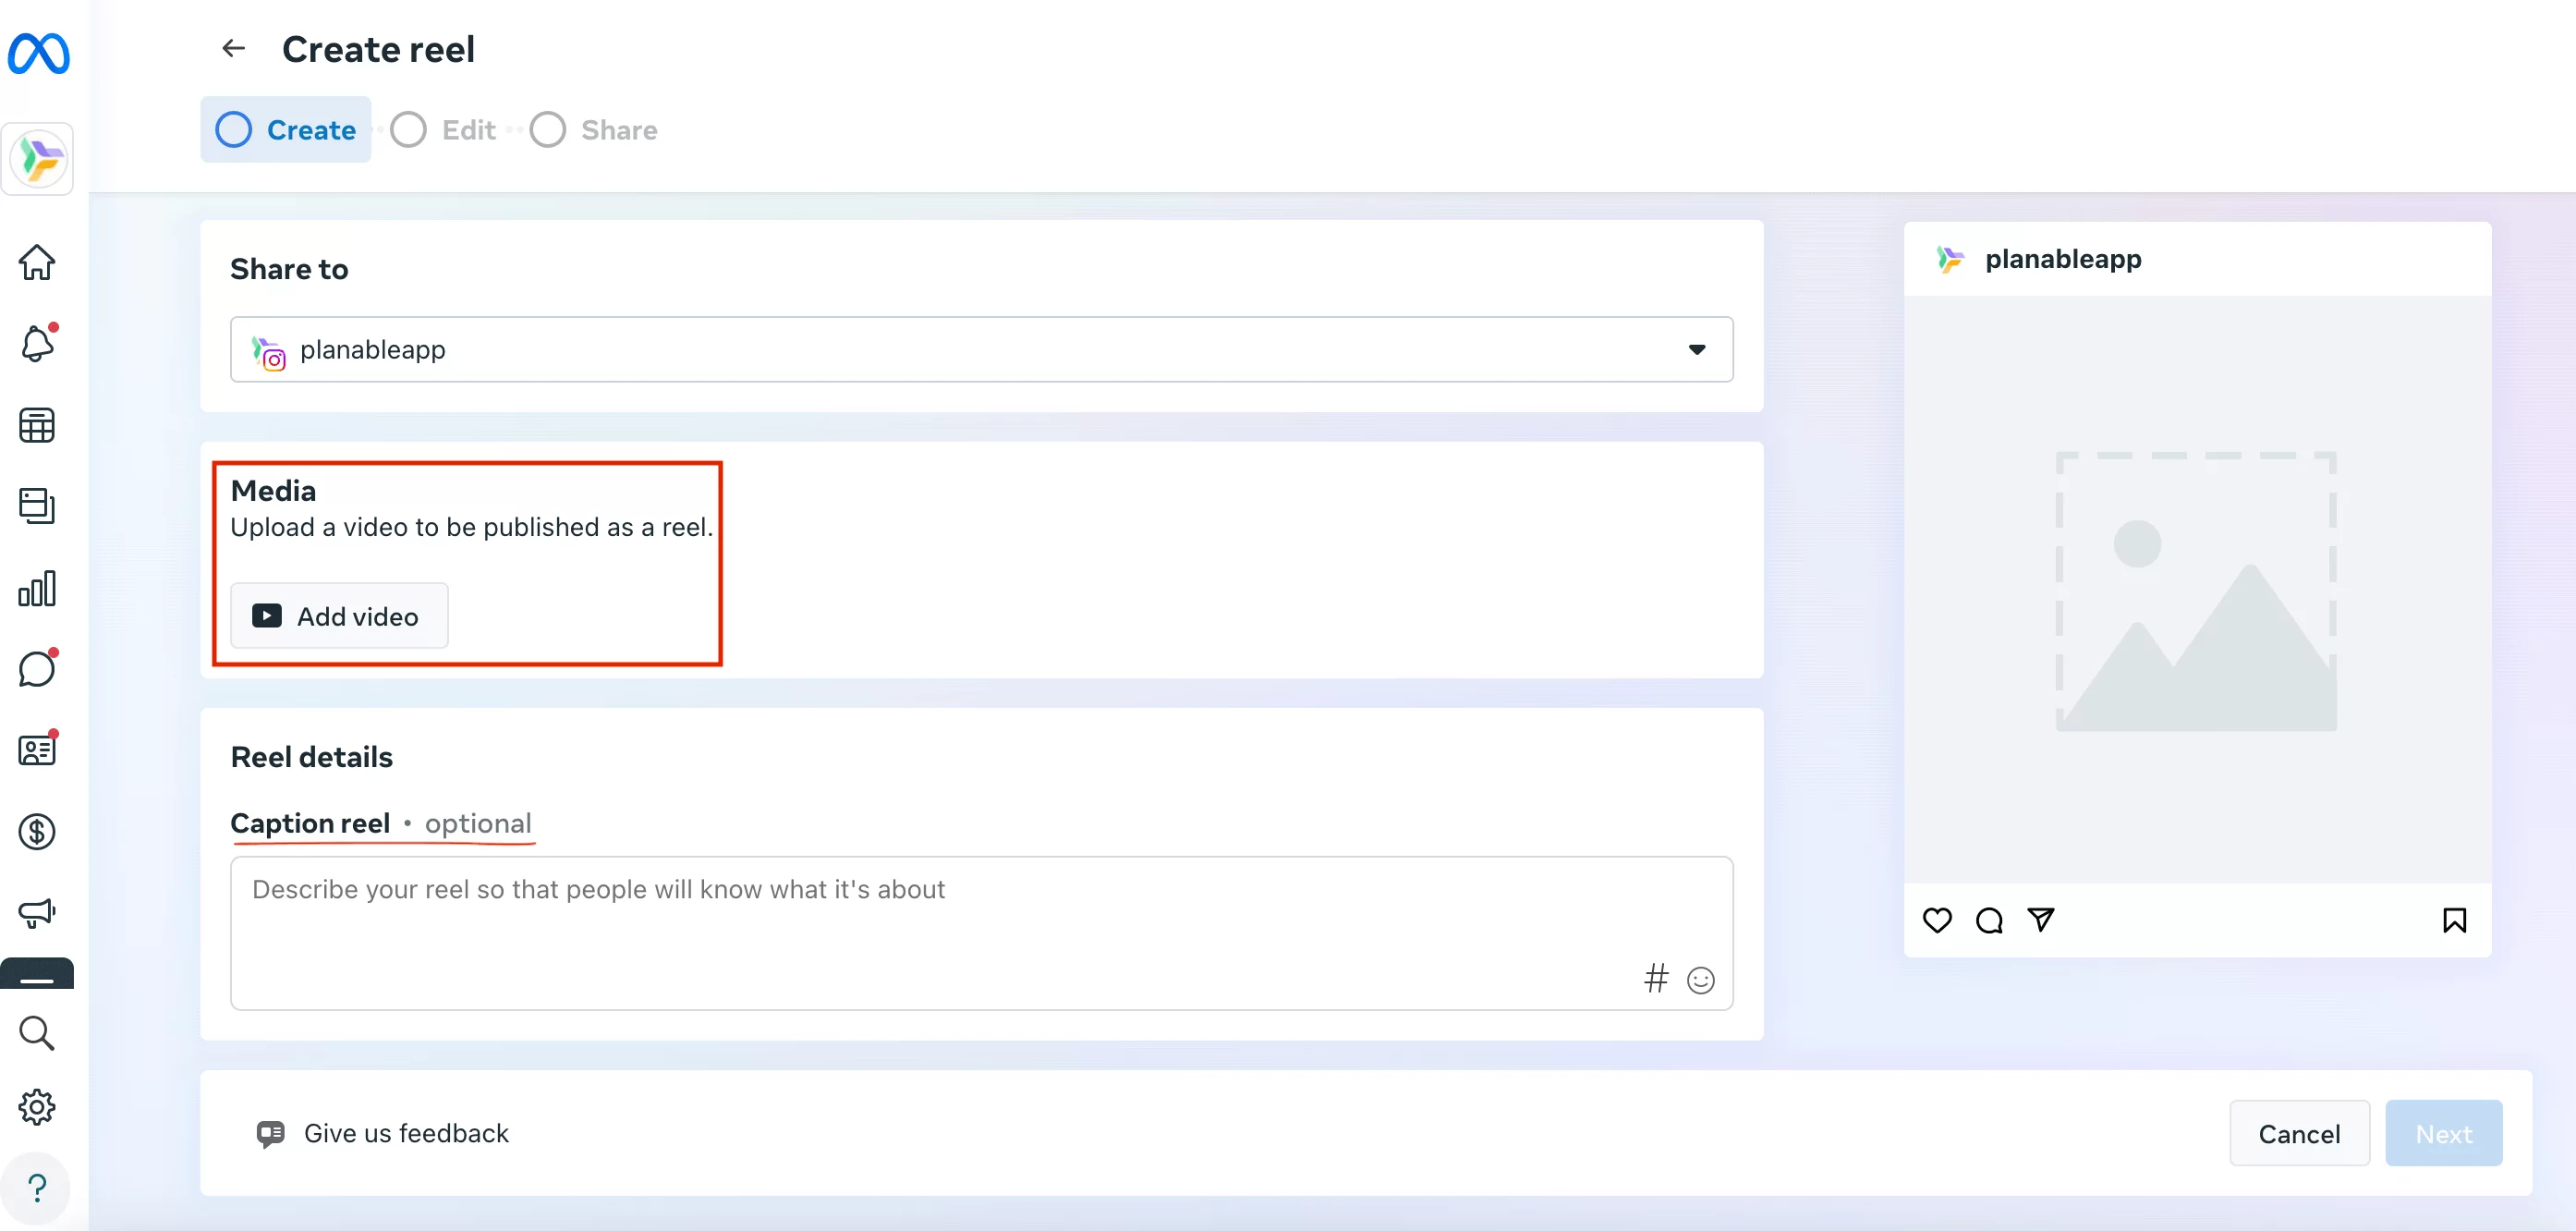
4. Click on Add video to upload your reel, and add a caption if you wish.

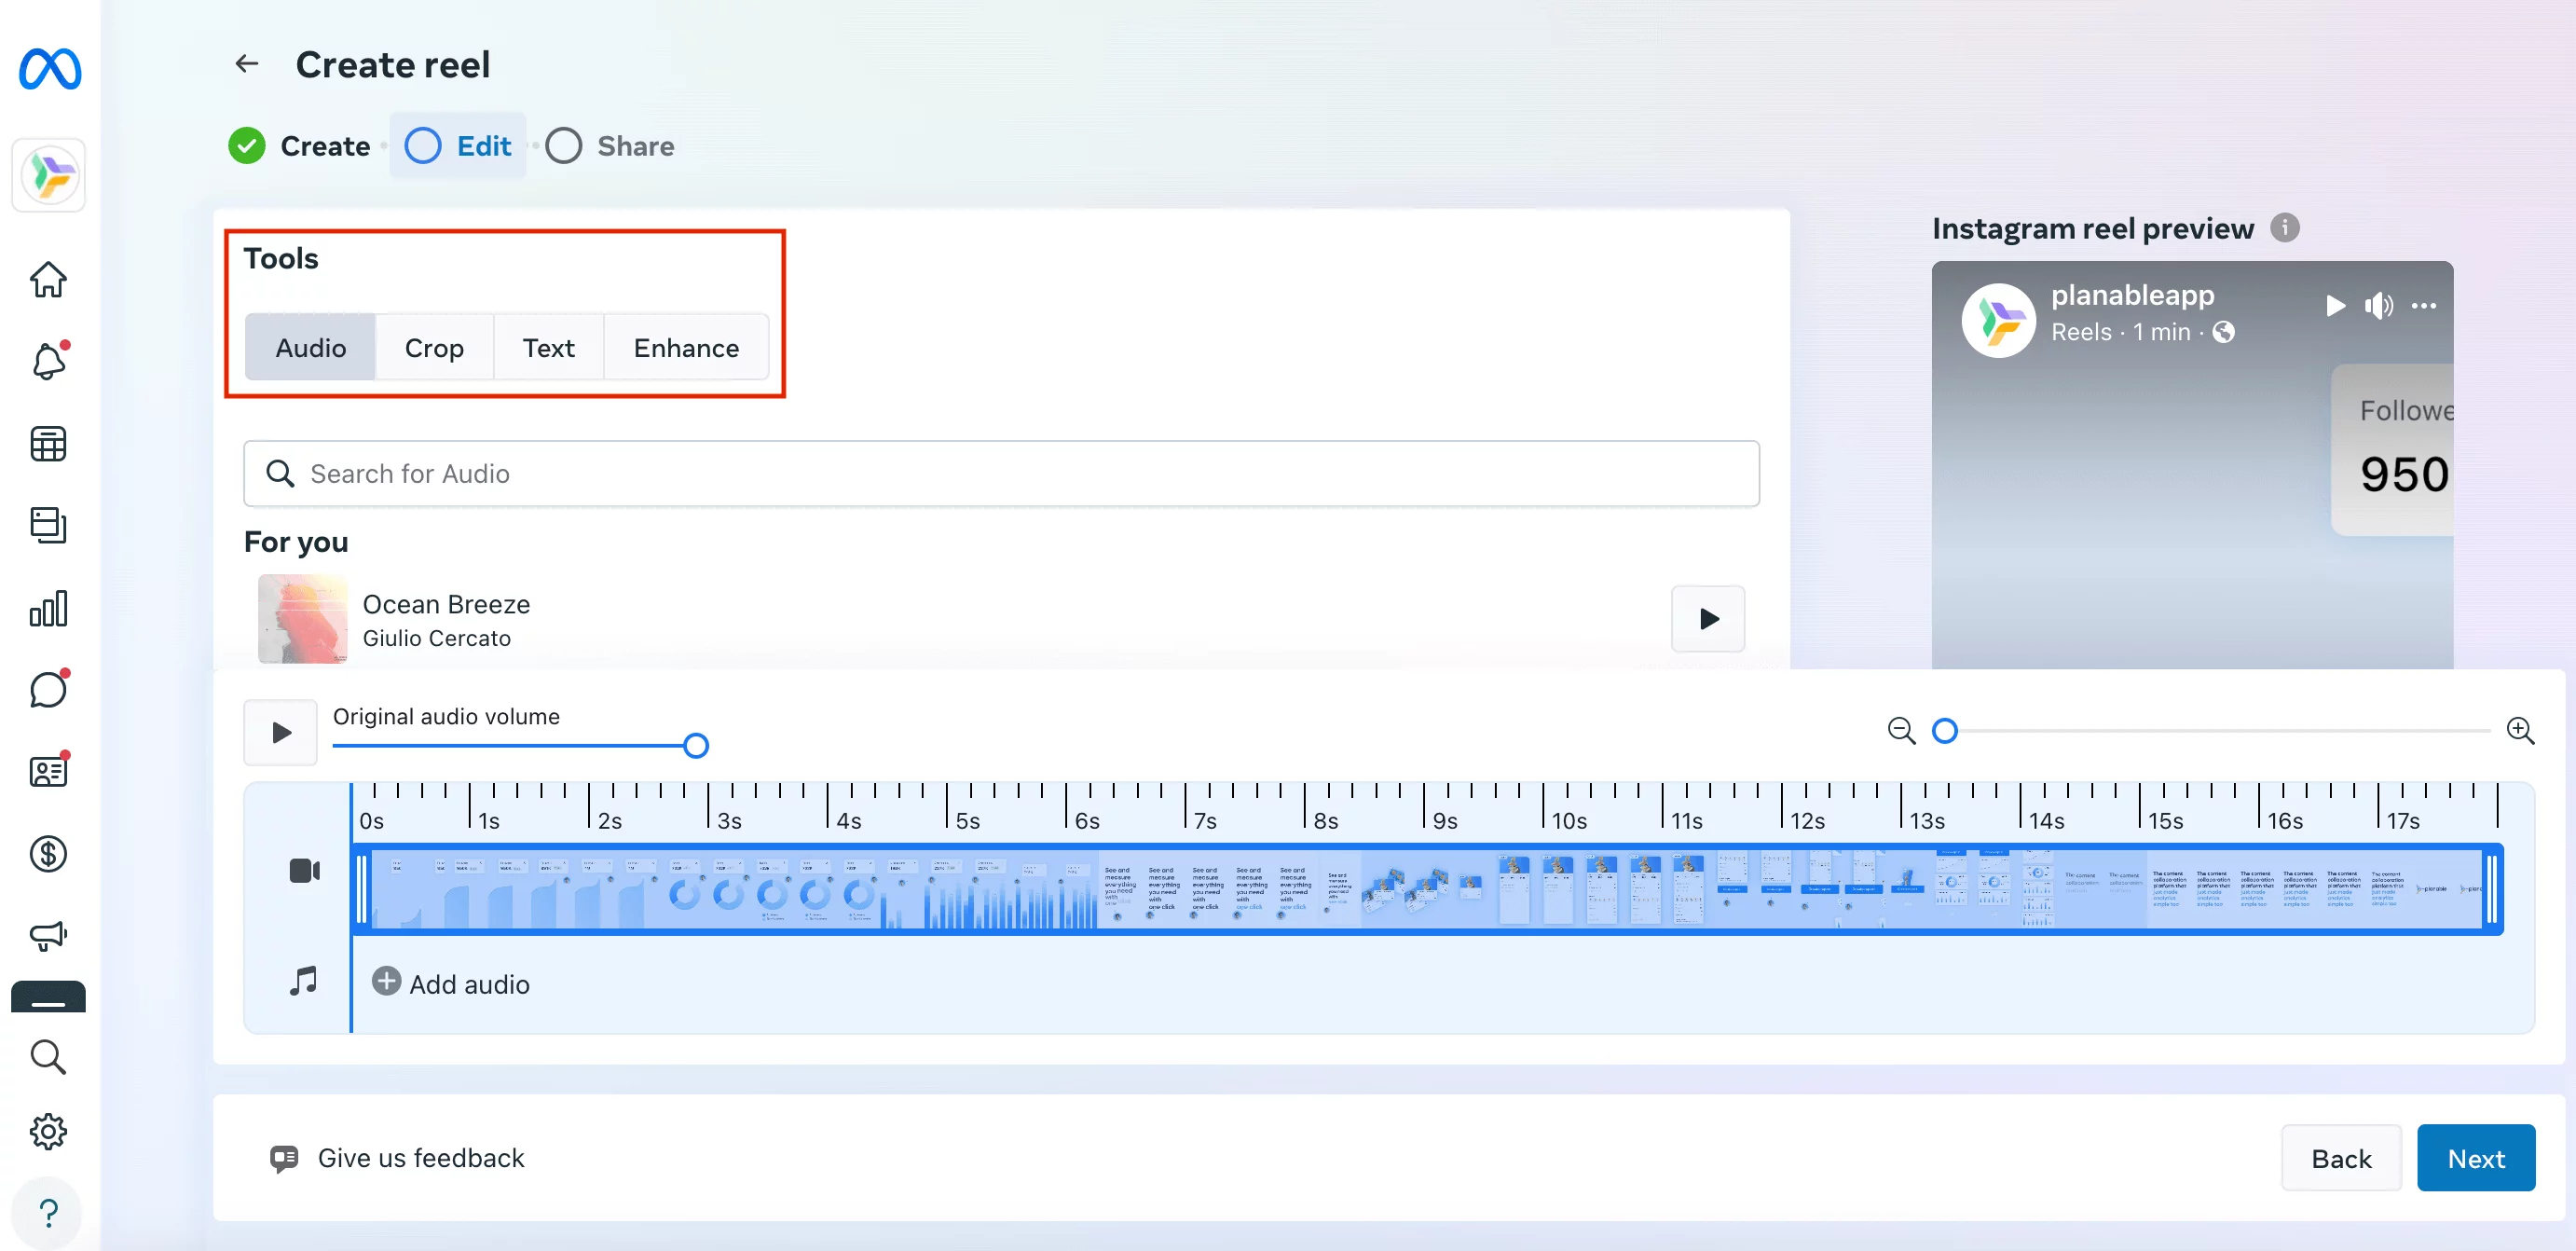
5. Click Next to Edit your video with using these options: Audio, Crop, Text & Enhance.

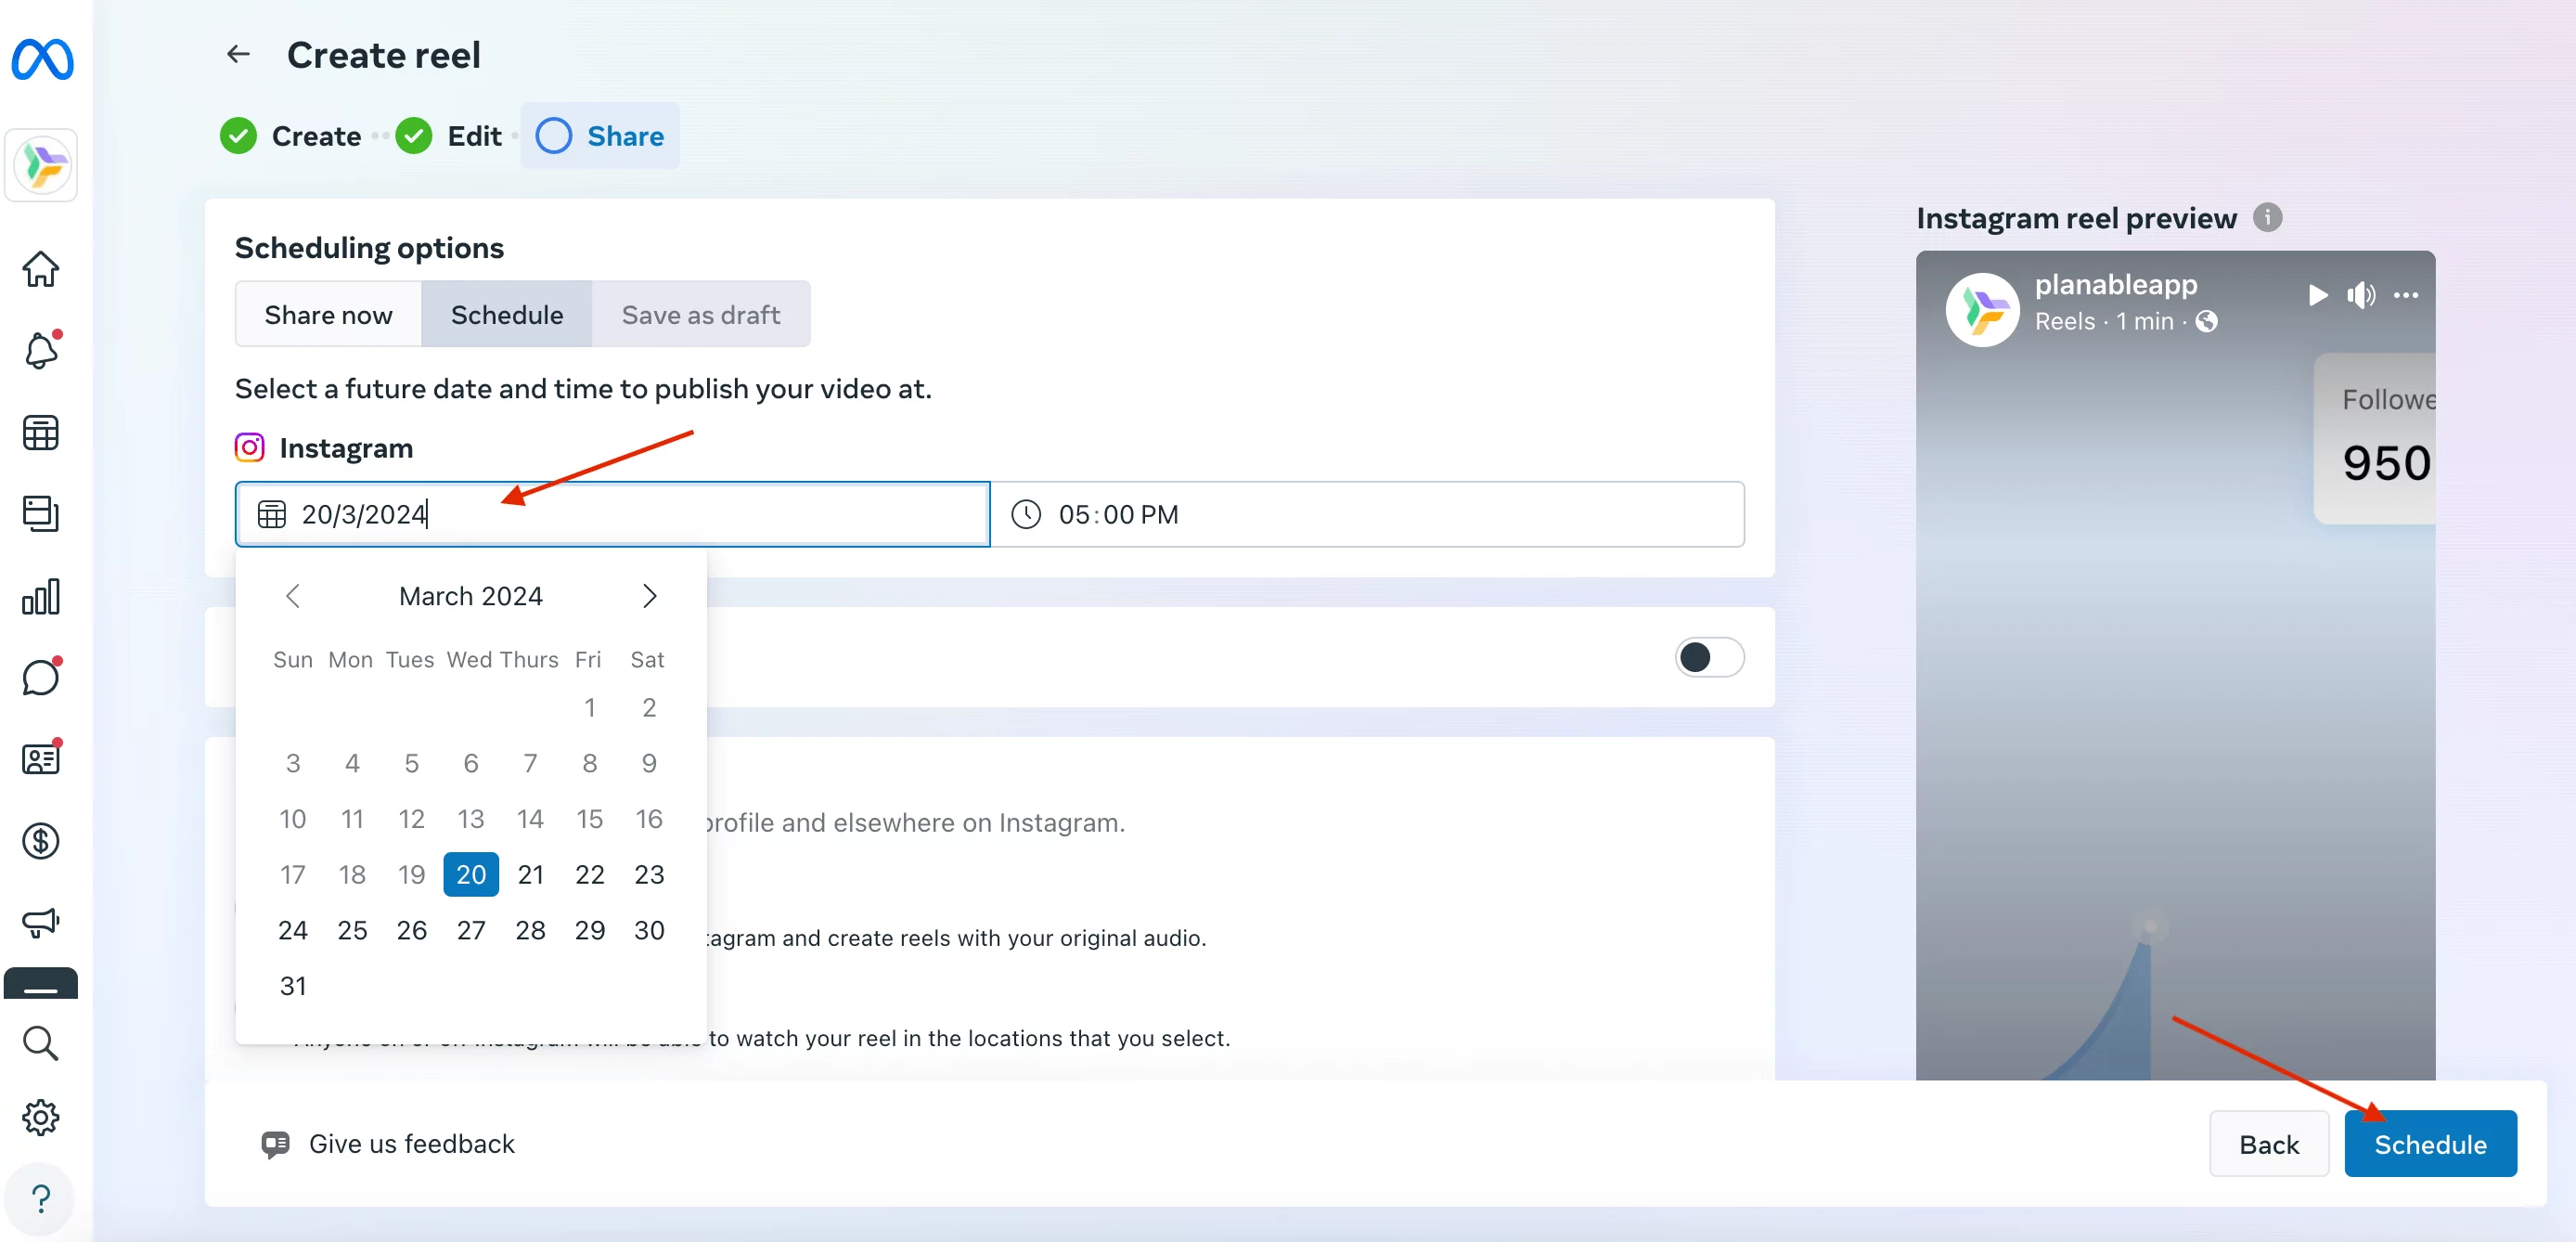
6. Click Next and hit Schedule.
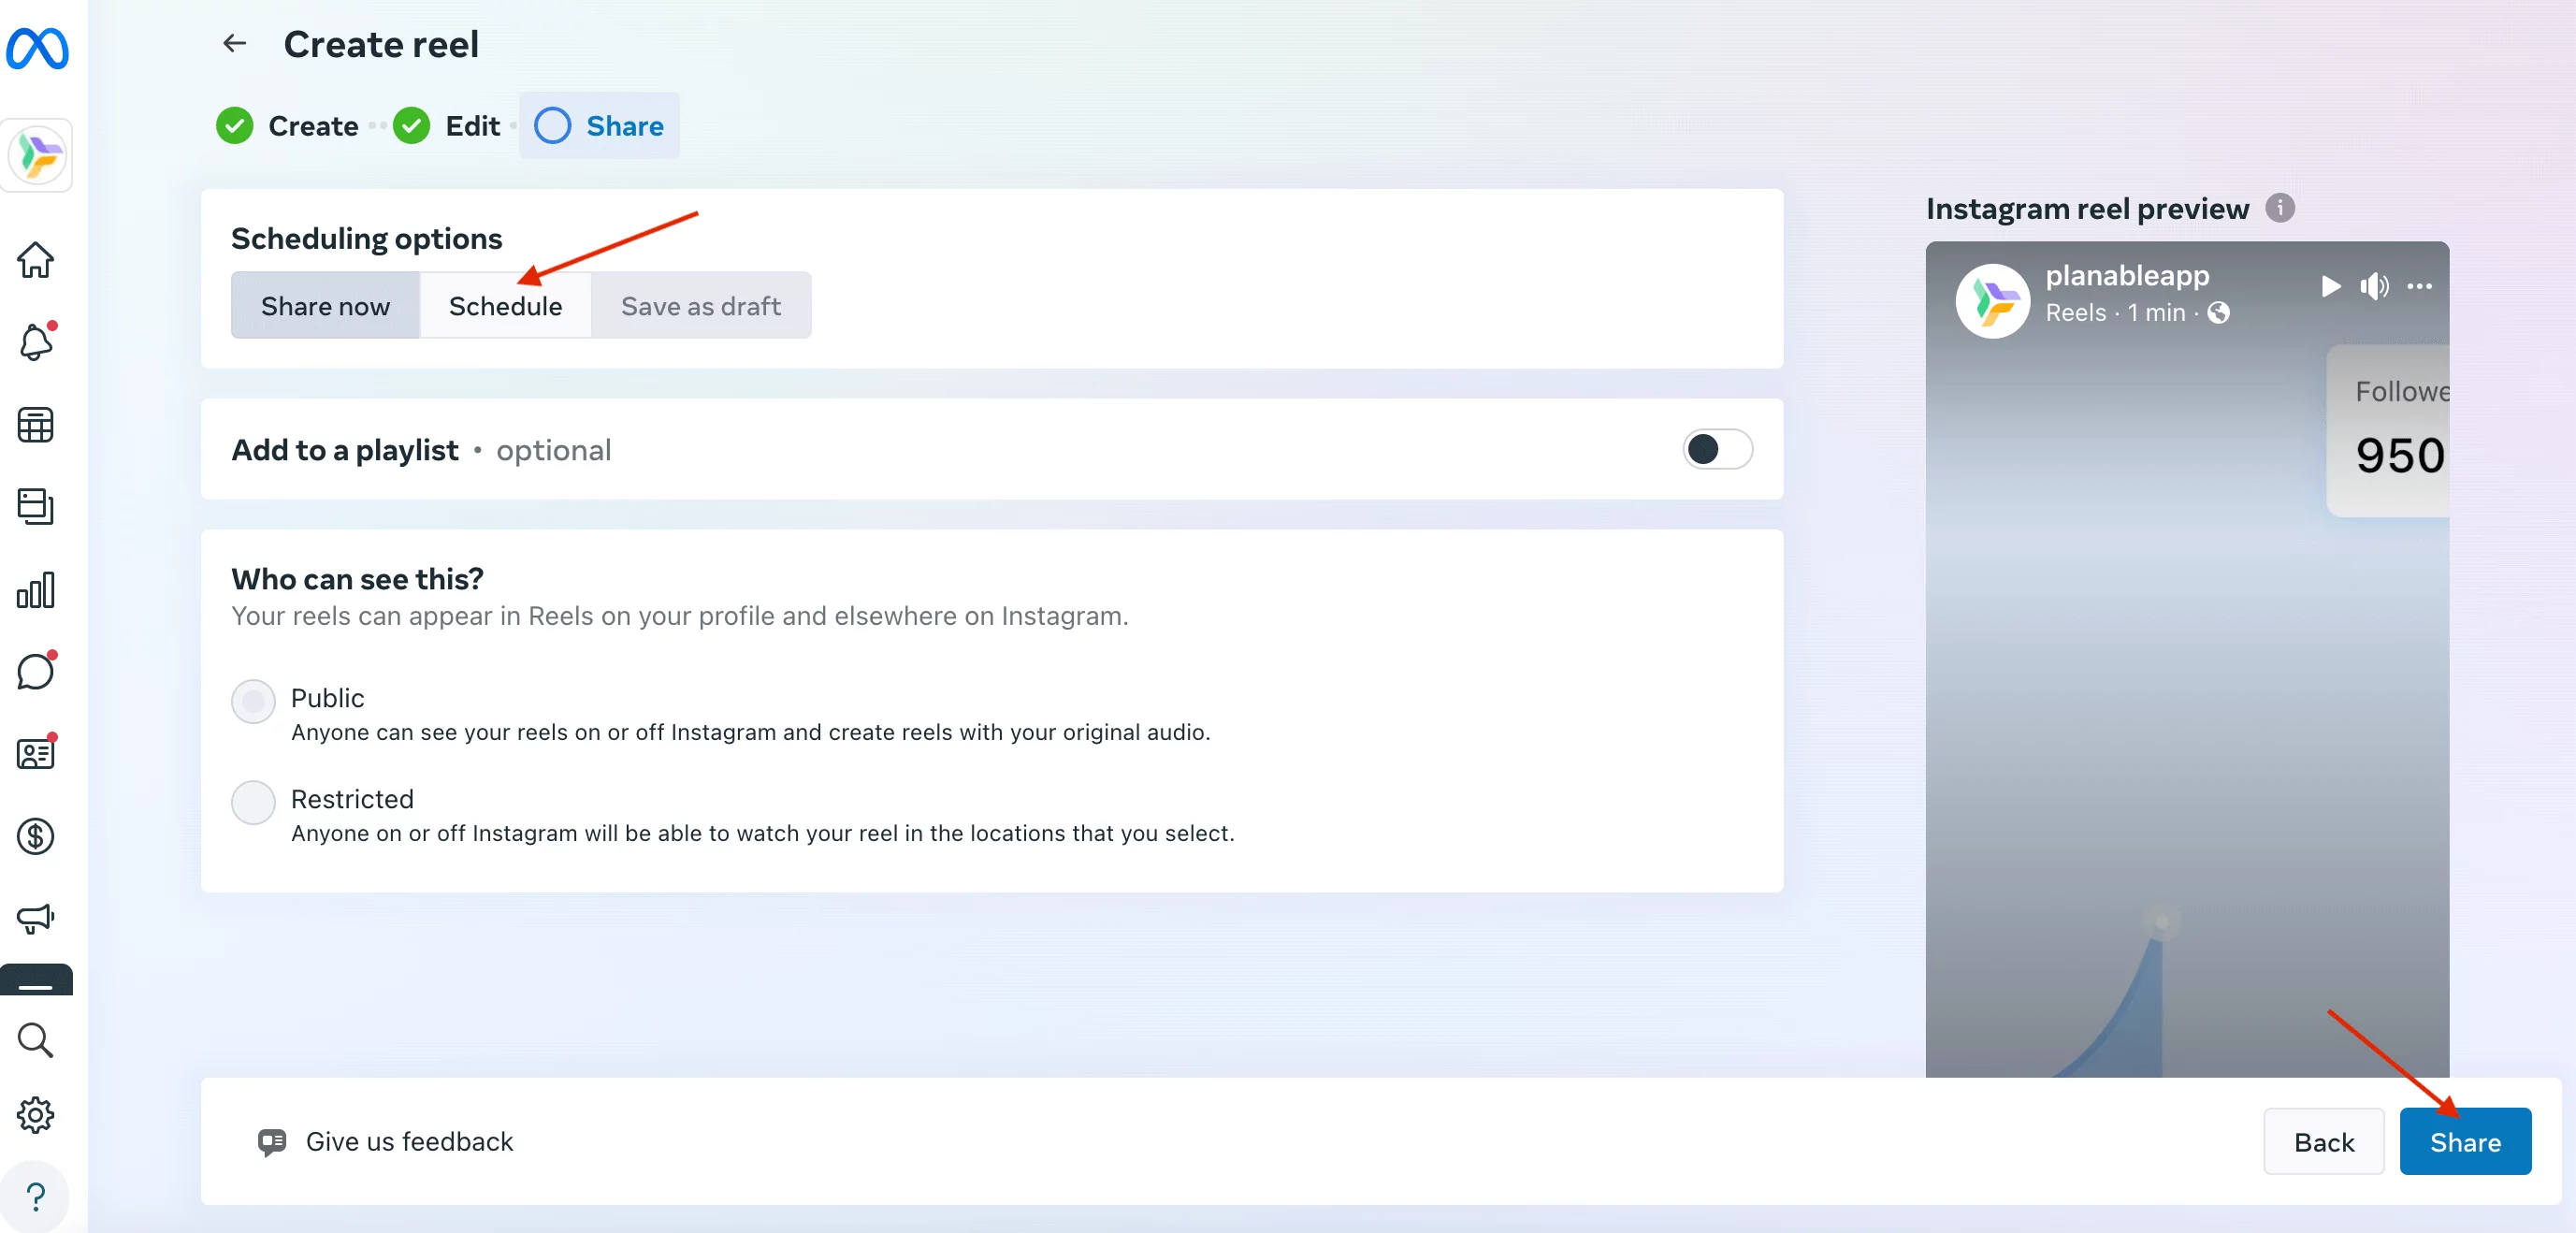

7. Select date and time and click the Schedule button.

Schedule Reels in advance for free with Planable, step by step
While Instagram has its own scheduling tools, third-party schedulers bring more features and flexibility to the table, making managing your Instagram content easier and more effective. Here are the steps for scheduling a Reel with Planable:
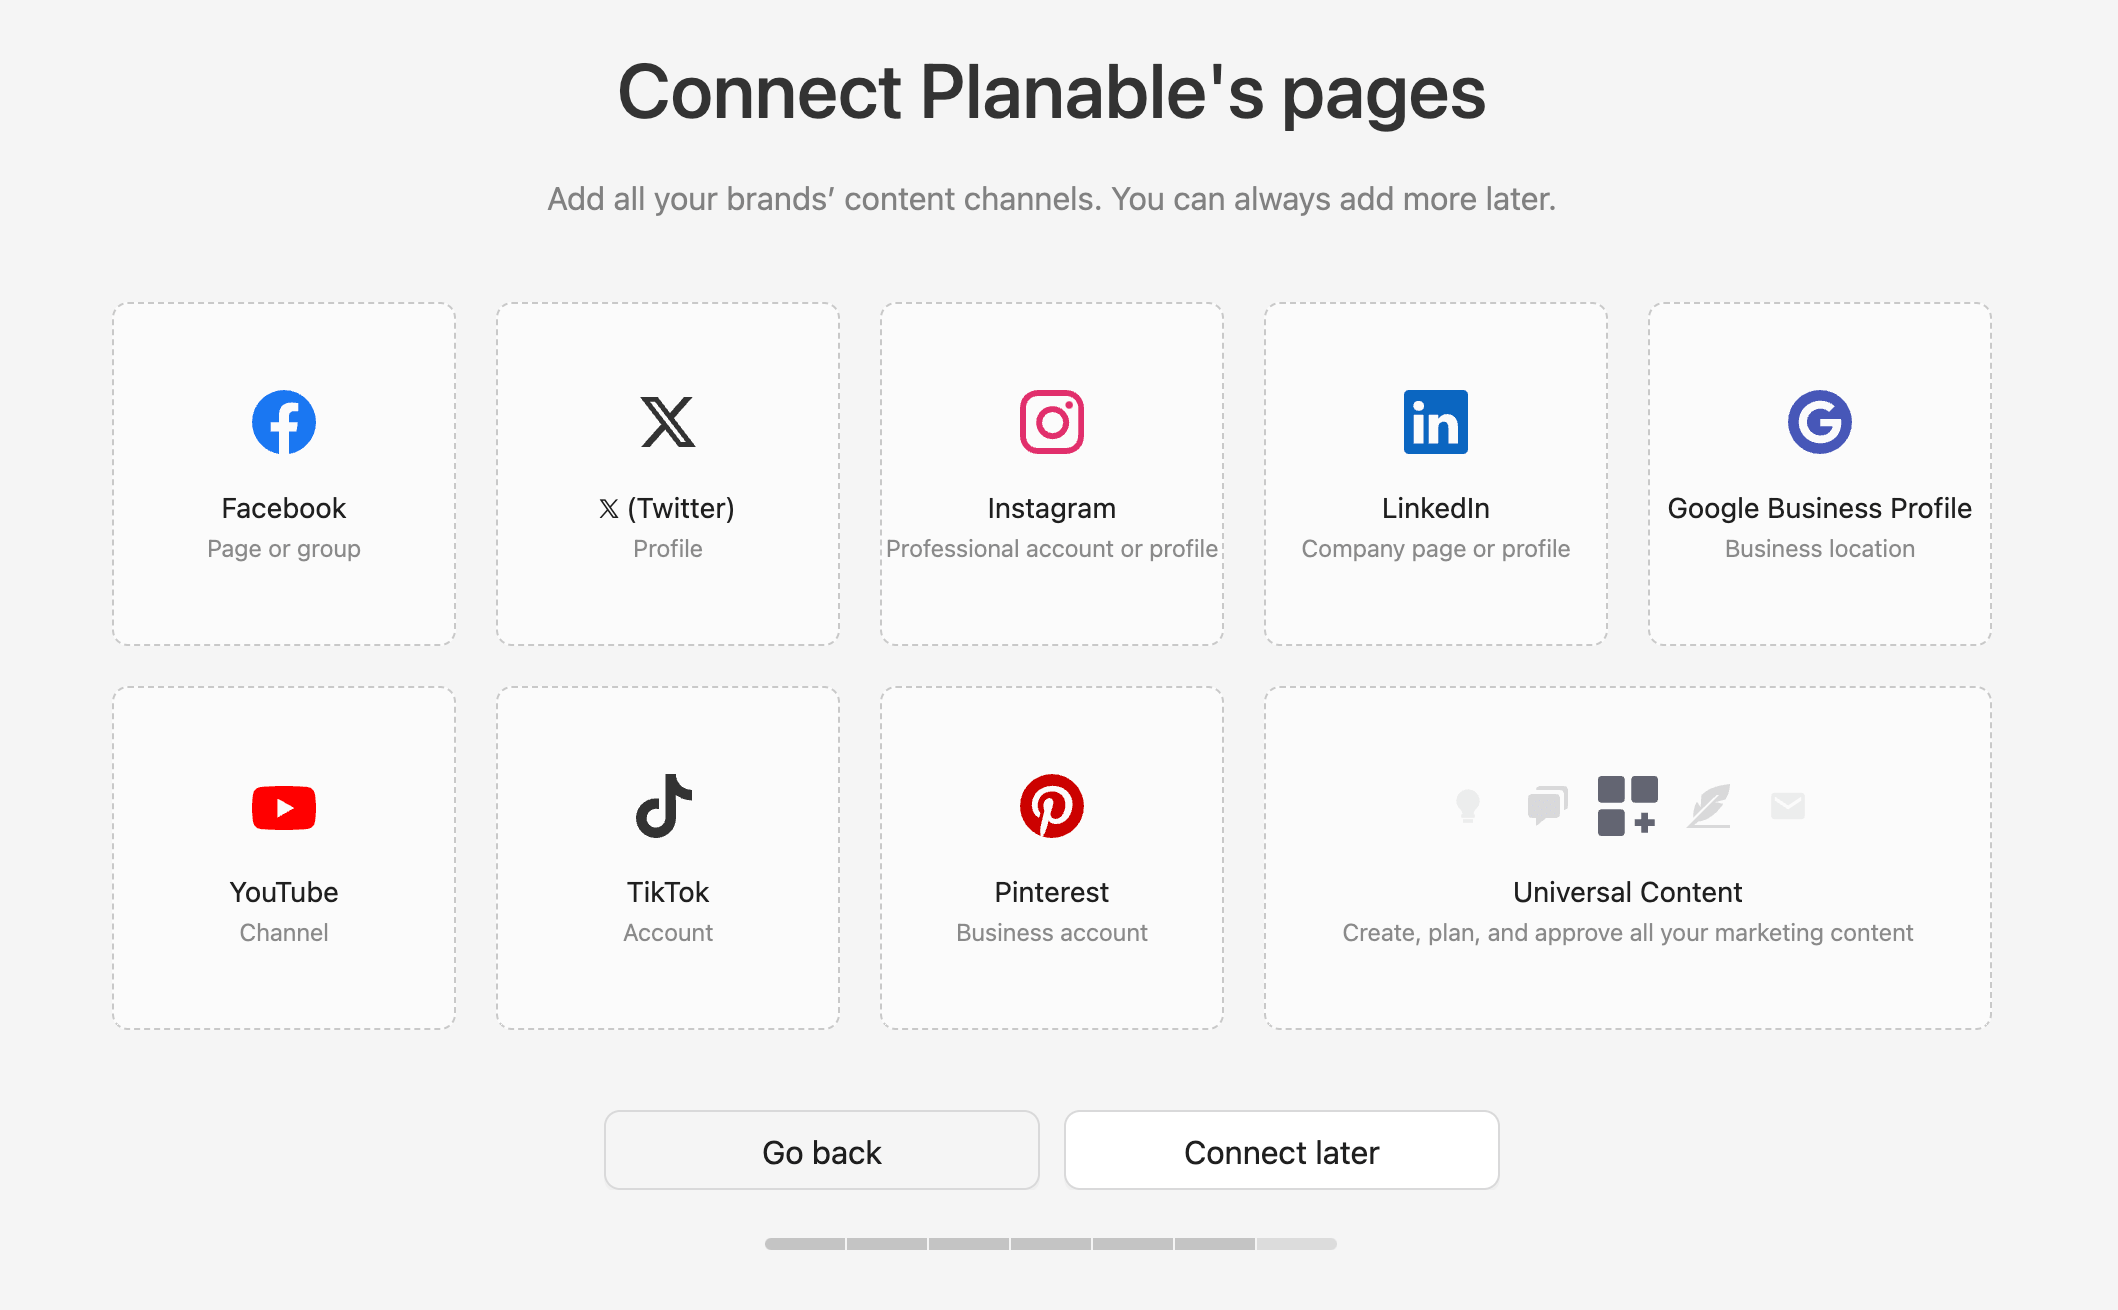
2. Connect your Instagram profile (and all the platforms where you want to schedule posts ahead of time).

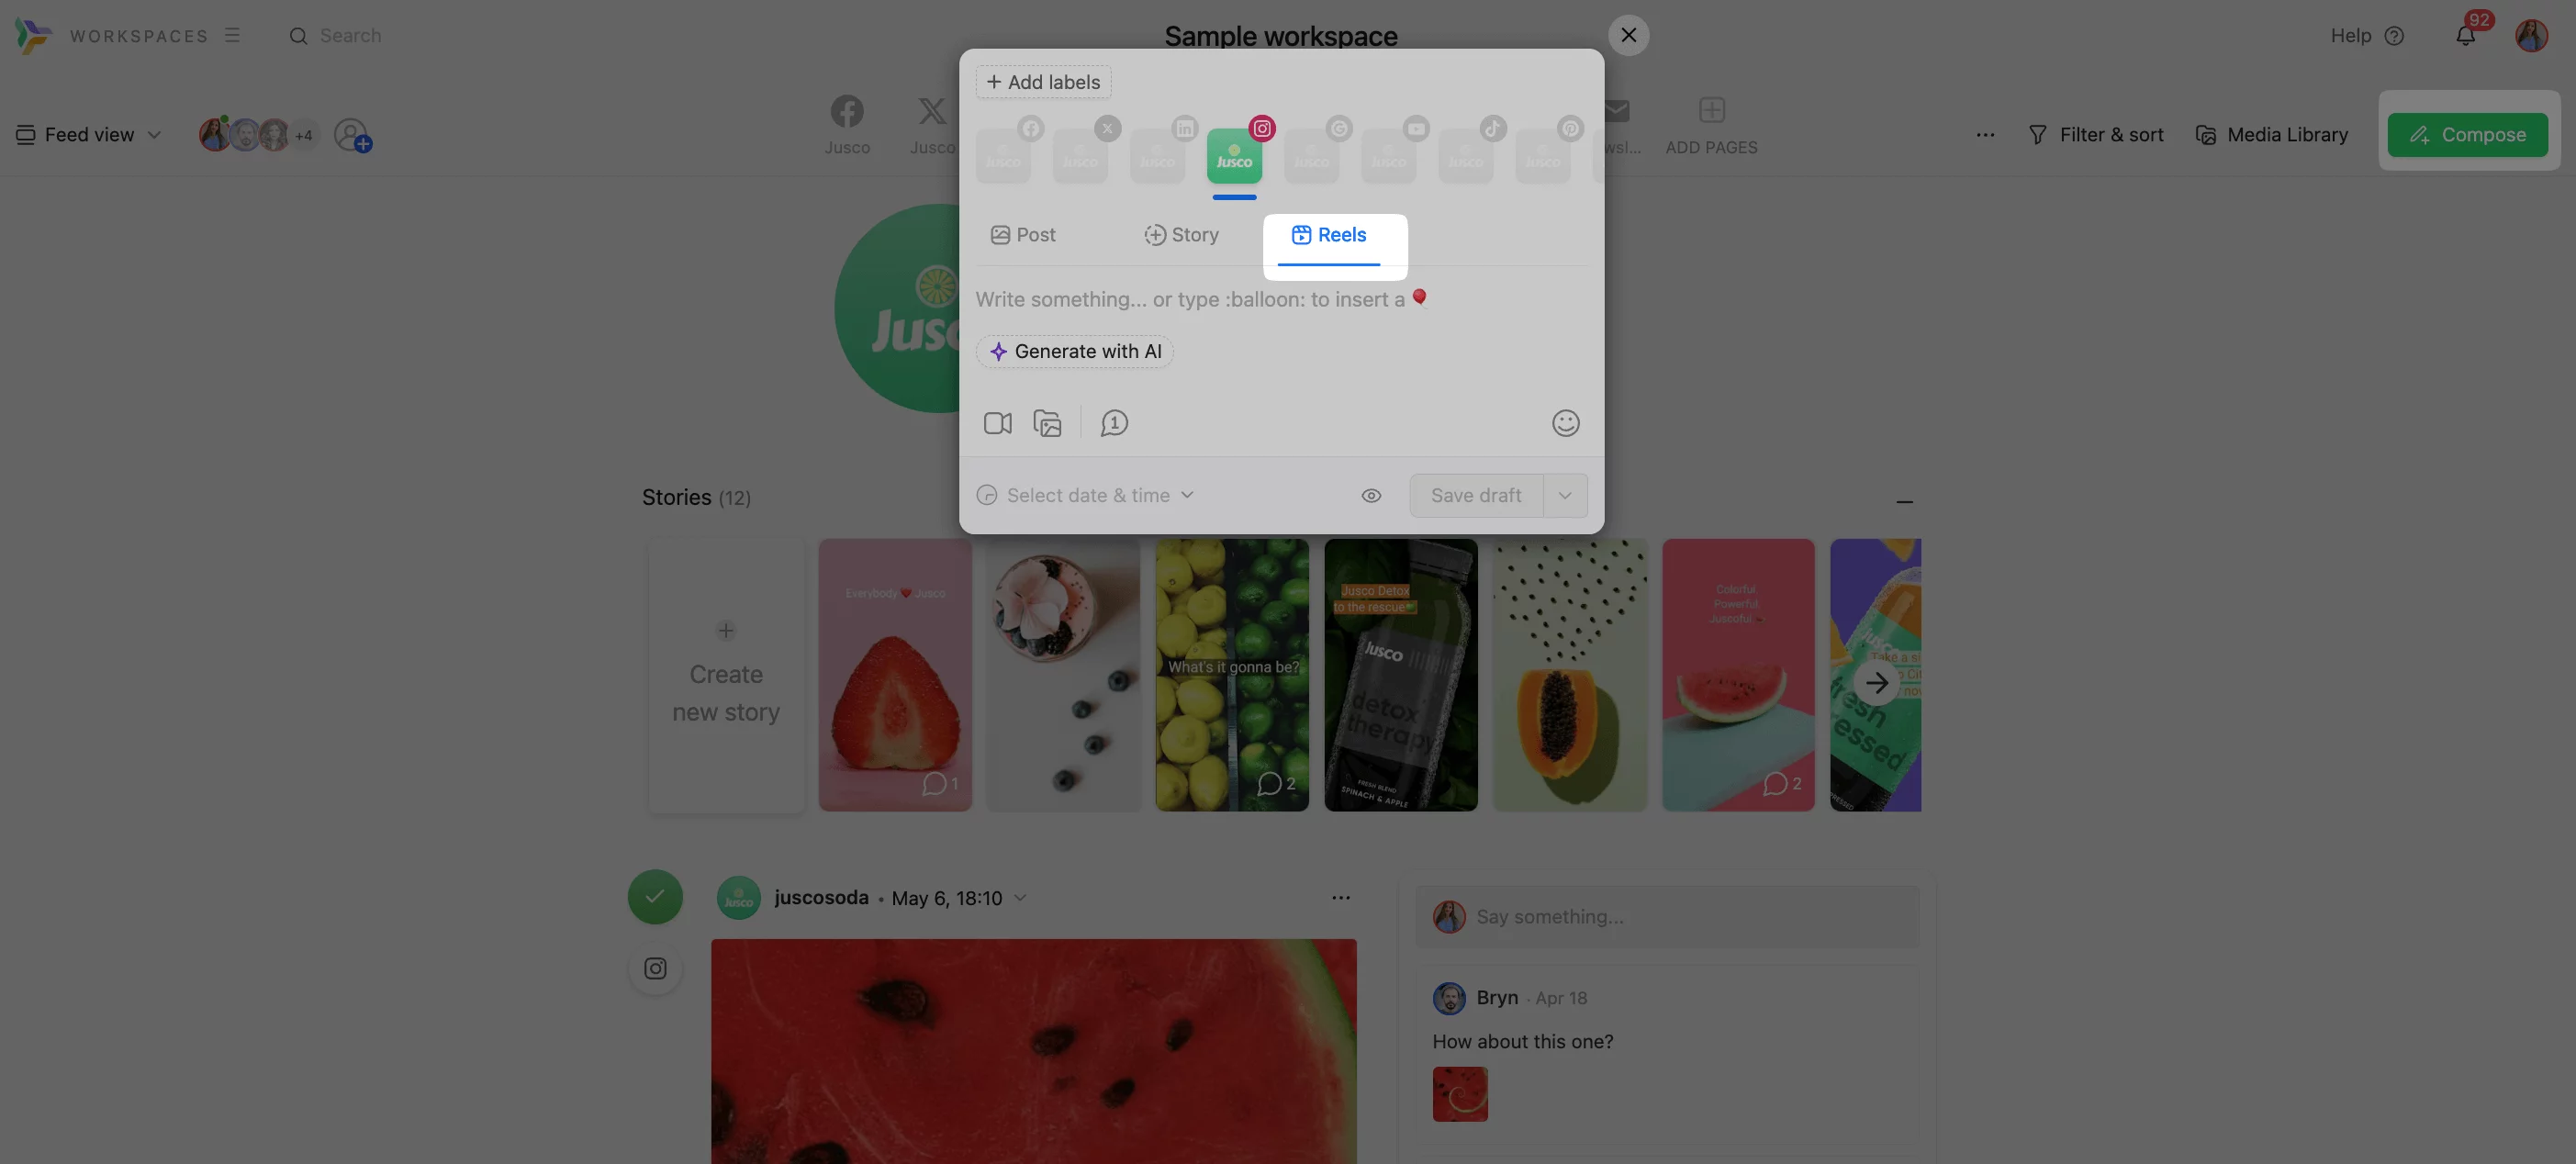
3. From your workspace, click Compose, select the Instagram tab and open the Reels section.

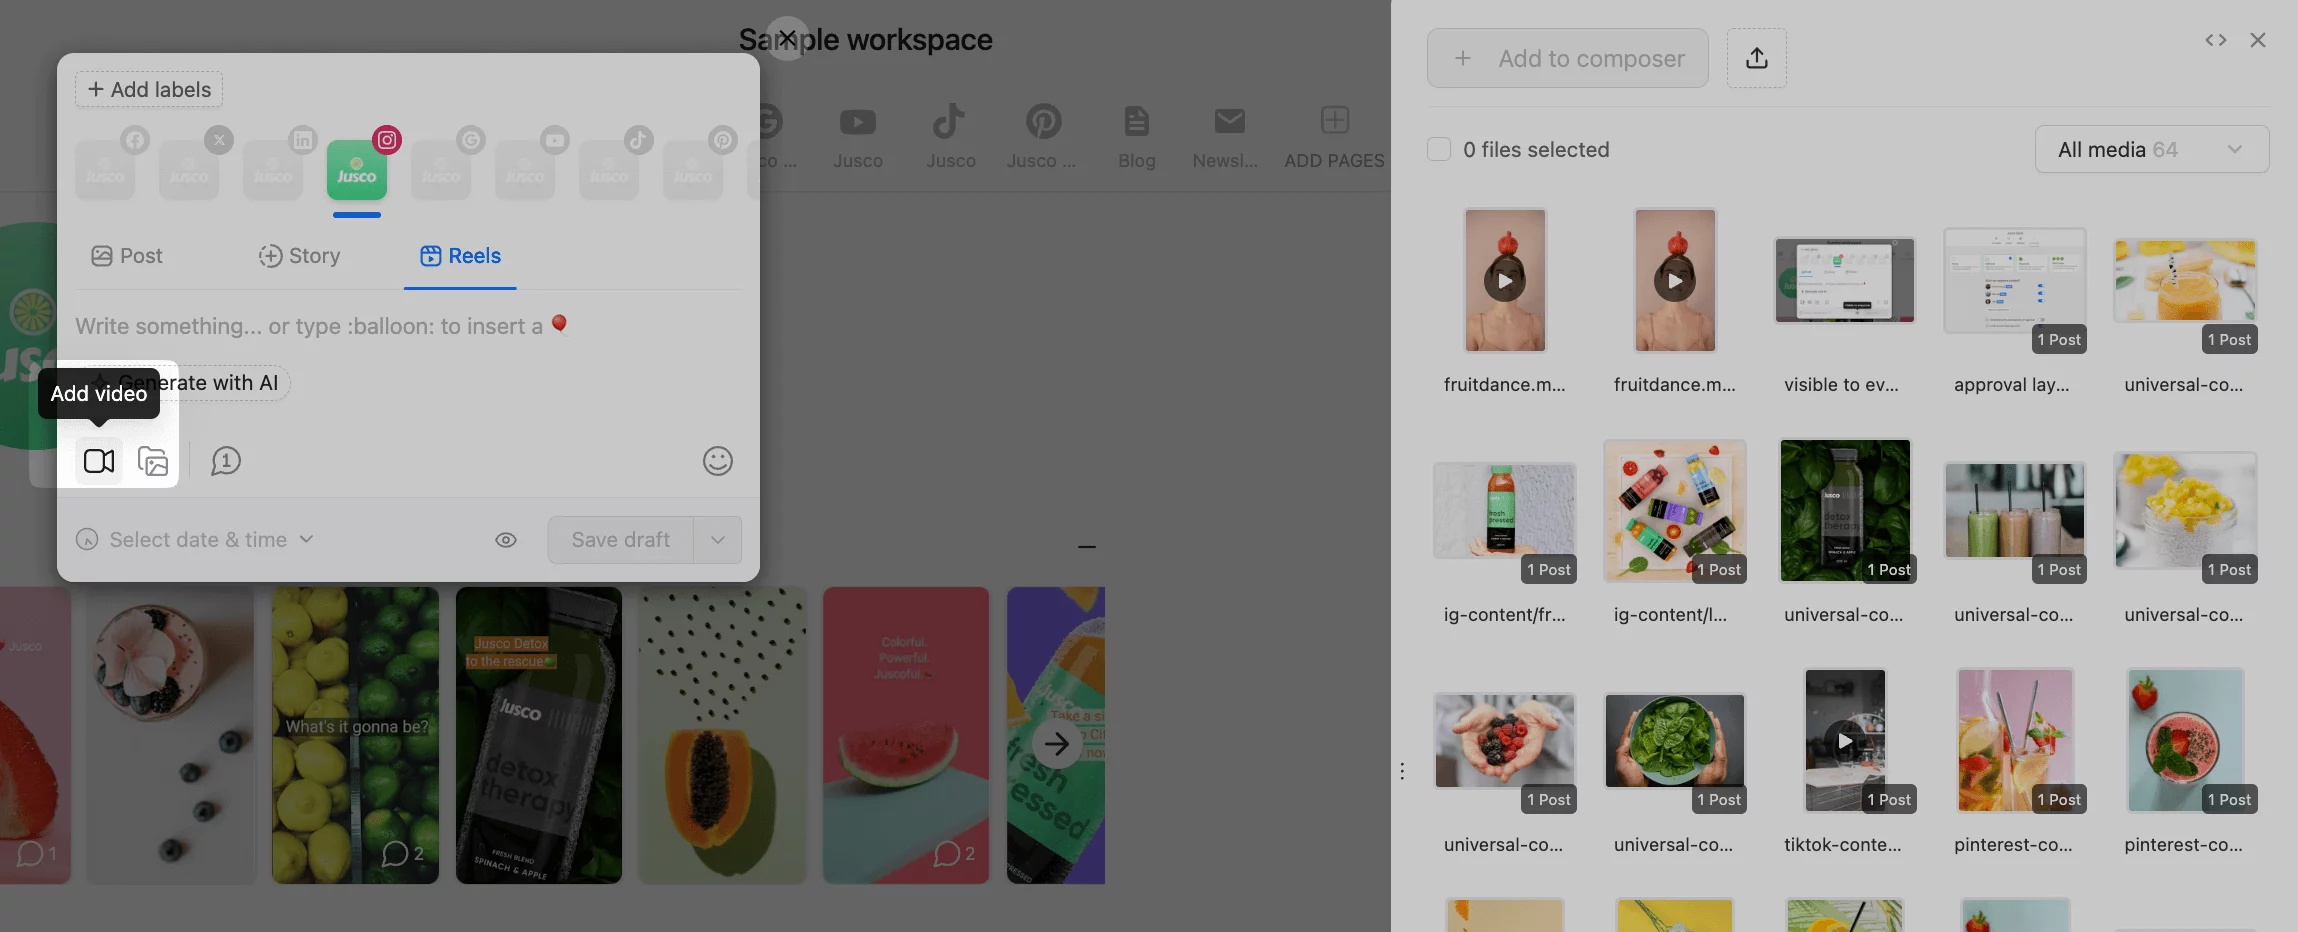
4. Upload your video or choose one from the Media Library.

5. Optional: Edit the video thumbnail or Trim the video if necessary.
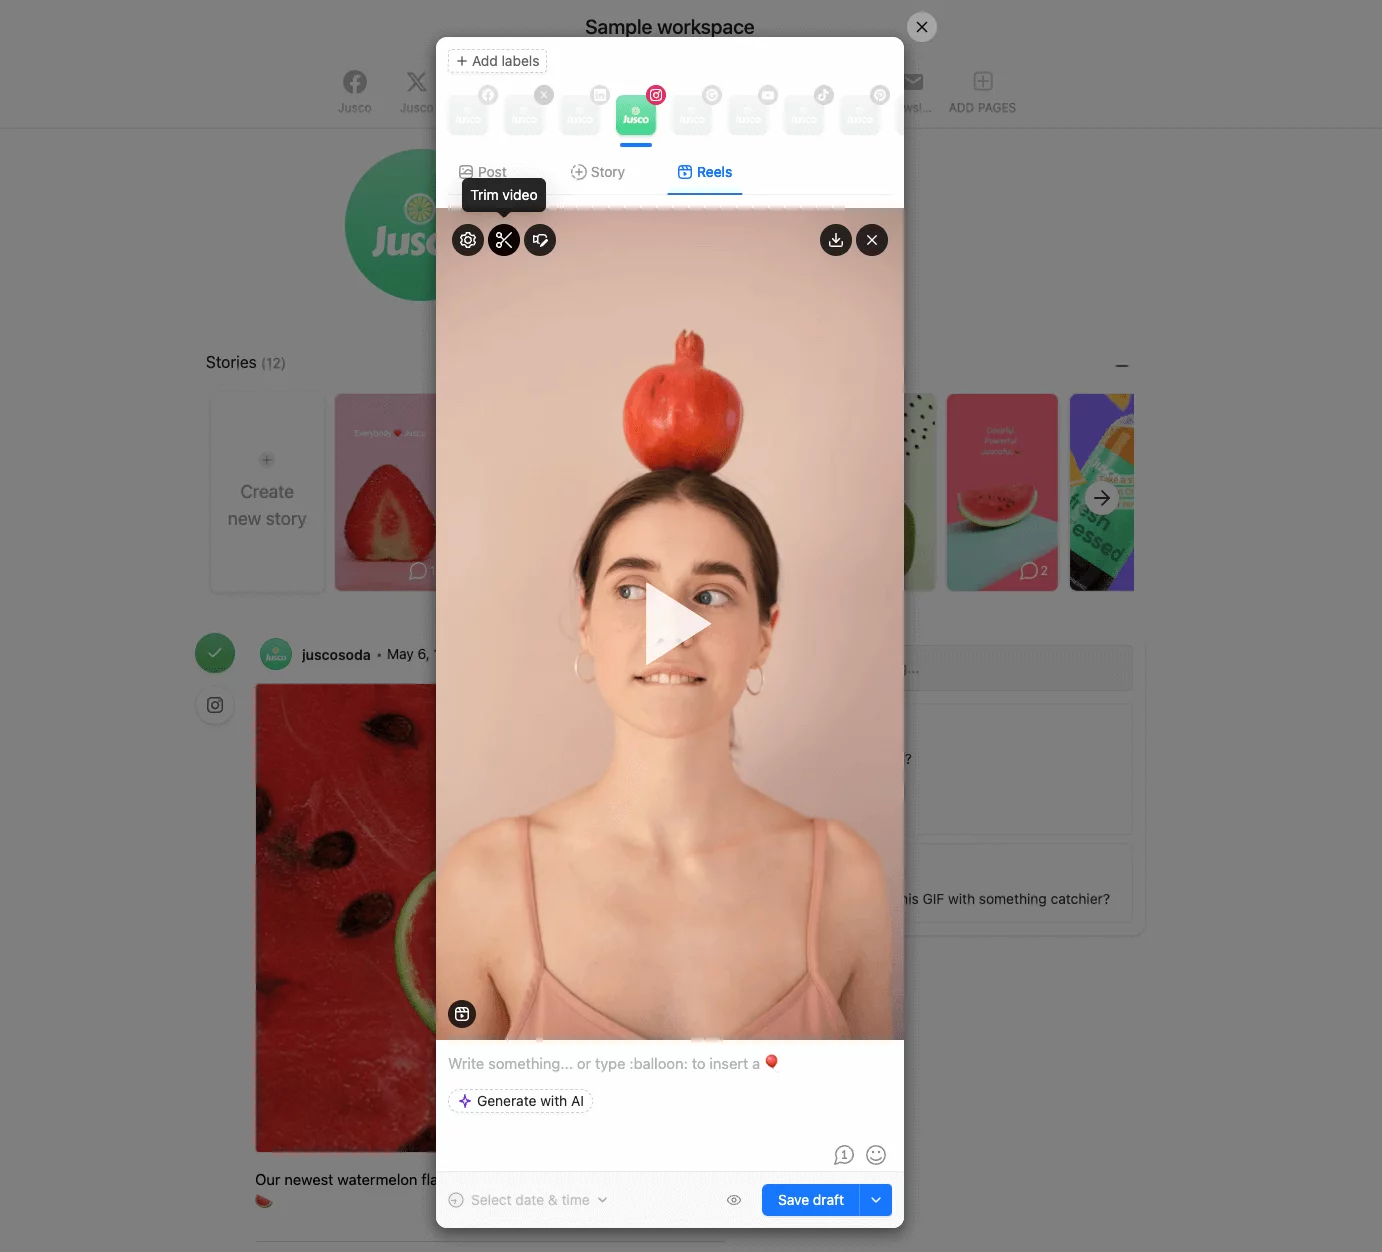

6. Write your copy.
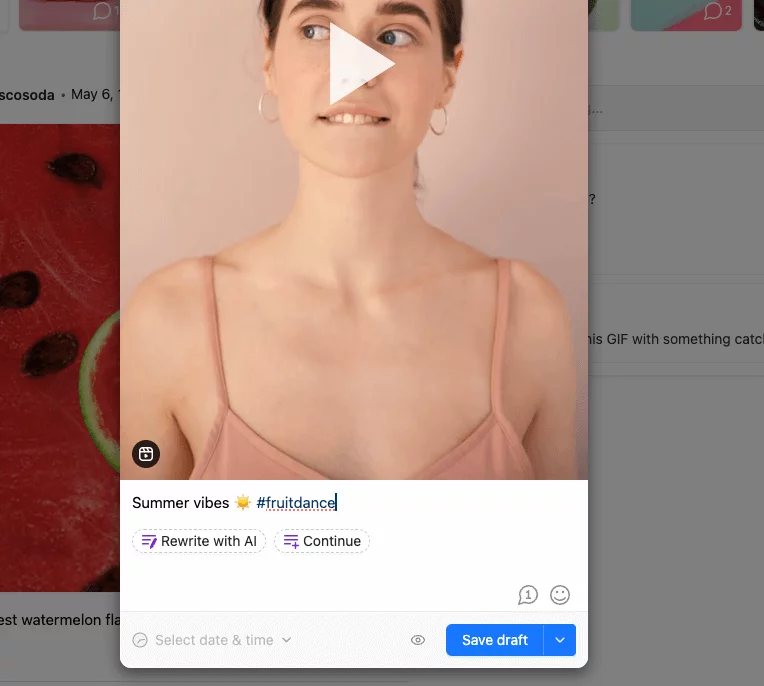

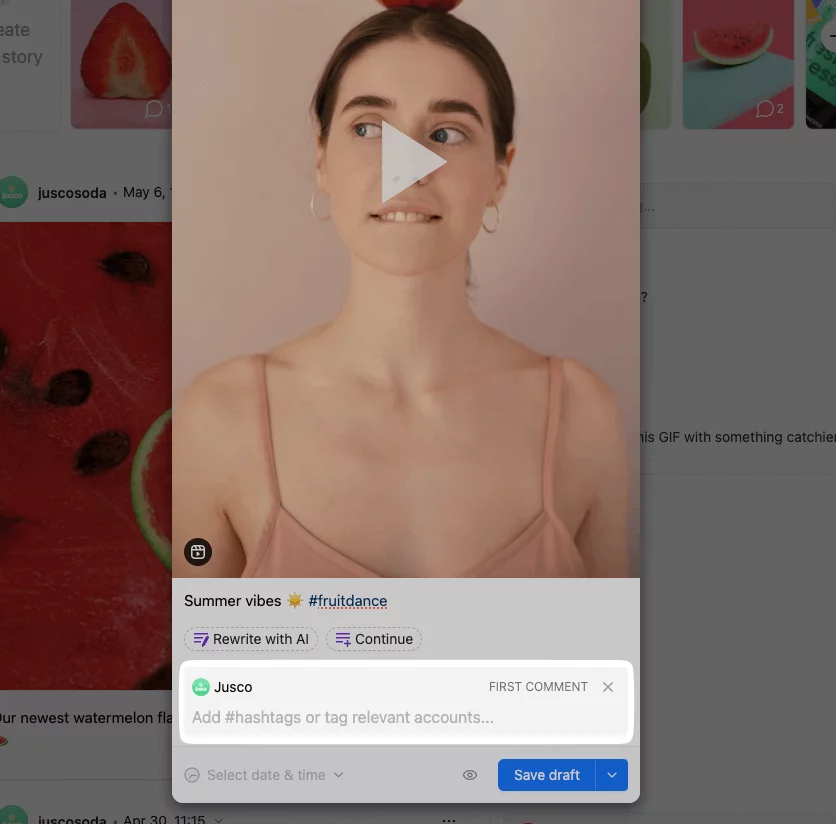
Optional: schedule the first comment to include hashtags or tag relevant accounts.

7. Click Select date and time to choose when the Reel goes live.
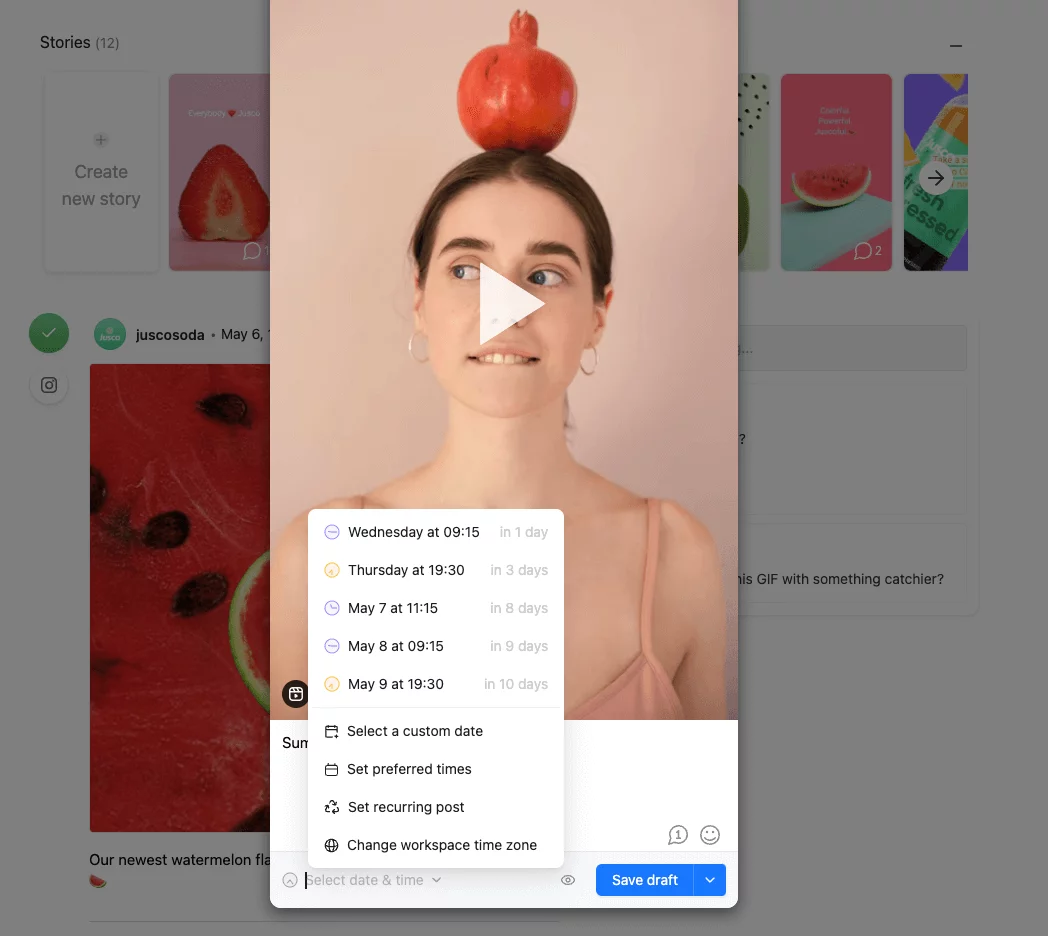

8. Click the Schedule button to schedule your Reels from your Instagram page within Planable.
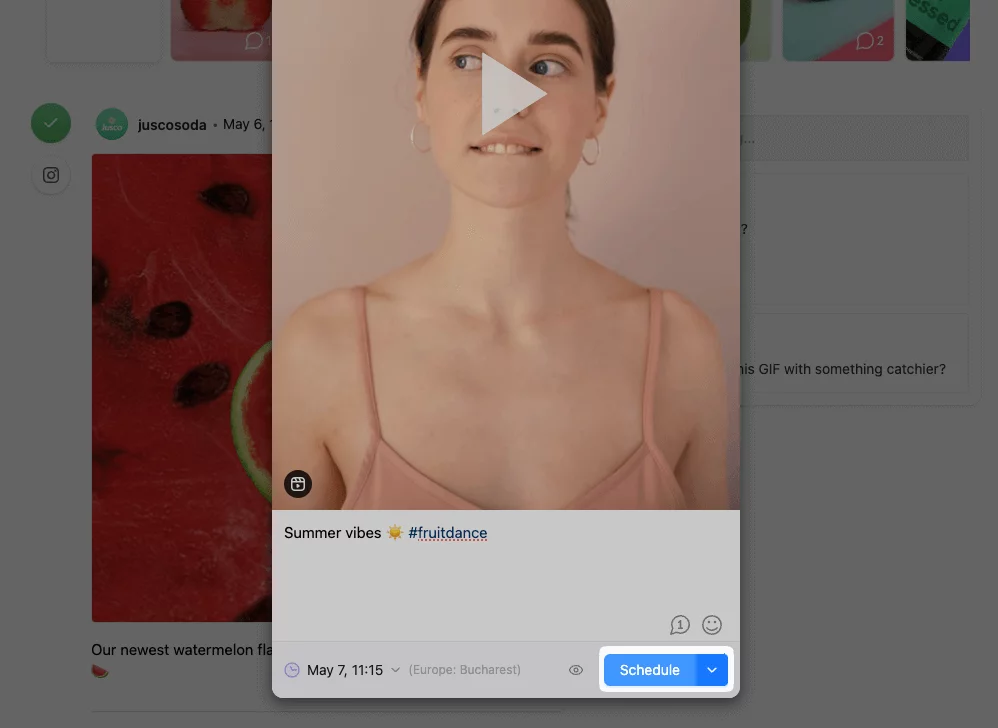

Congrats! Your video will be automatically published to your Reels feed, and you don’t have to post manually anymore! Choose the perfect publishing time for your Reels and never miss peak engagement times ever again.
Planable offers direct publishing for Instagram posts, Reels and Stories.
To publish a Reel directly through Planable, you must meet these requirements:
- Instagram Reels ratio: 9:16 (no more, no less)
- Instagram Reels duration: between 5 and 90 seconds
*Please note that if your post doesn’t fulfill both requirements, it will be published as a regular Instagram video, not a Reel, due to Instagram’s API limitations.
Download the iOS app on the AppStore or the Android app on Google Play to publish Reels to Instagram with Planable.
Why use Planable as your Instagram Reel Scheduler?
If you’re a social media manager or an agency with multiple clients, Planable helps you schedule Reels on Instagram, collaborate with others, and get reviews and approvals all in one place.
- plan your feed in advance with pixel-perfect previews
- share upcoming posts with colleagues, clients, or stakeholders
- set multiple layers of approval (or none)
- organize your Instagram grid ahead of time
5 reasons to schedule Instagram Reels in advance
A new report shows that Reels are generating the most reach (likes) on Instagram.
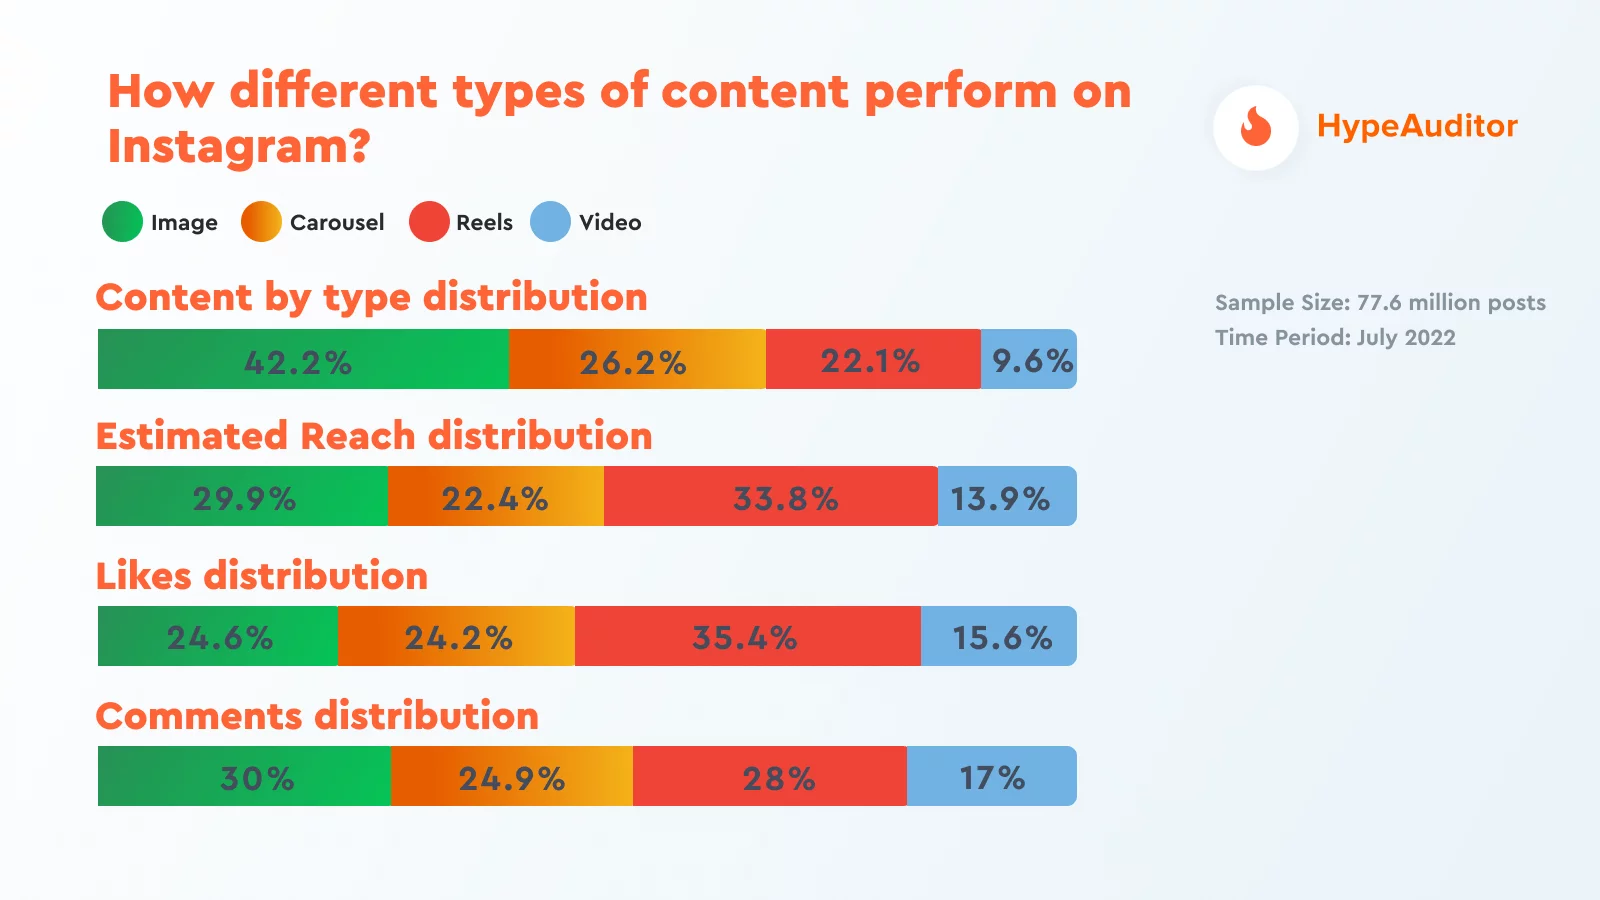

So organizing your future Reels videos to keep your audience engaged pays off. A scheduling tool enables you to:
- film and publish engaging content on Instagram consistently – there are many useful Reels tools to use
- free up time to work on your social media content strategy
- use a social media calendar to plan and schedule Reels around events or holidays
- take advantage of IG trends by filming multiple scenes in one day
- measure the success of your Reels and experiment with different songs, hashtags, or publishing times.
Bonus tip: since we’re back at organizing events, creating a QR code for your event or holiday will make it easier for potential attendees to act on the event-related prompts you include in your Reels.
Instagram Reels video requirements
Important details to know when you’re creating and scheduling Instagram Reels:
How long can Reels be?
Instagram Reels can be up to 90 seconds long.
What ratio do Reels need to be?
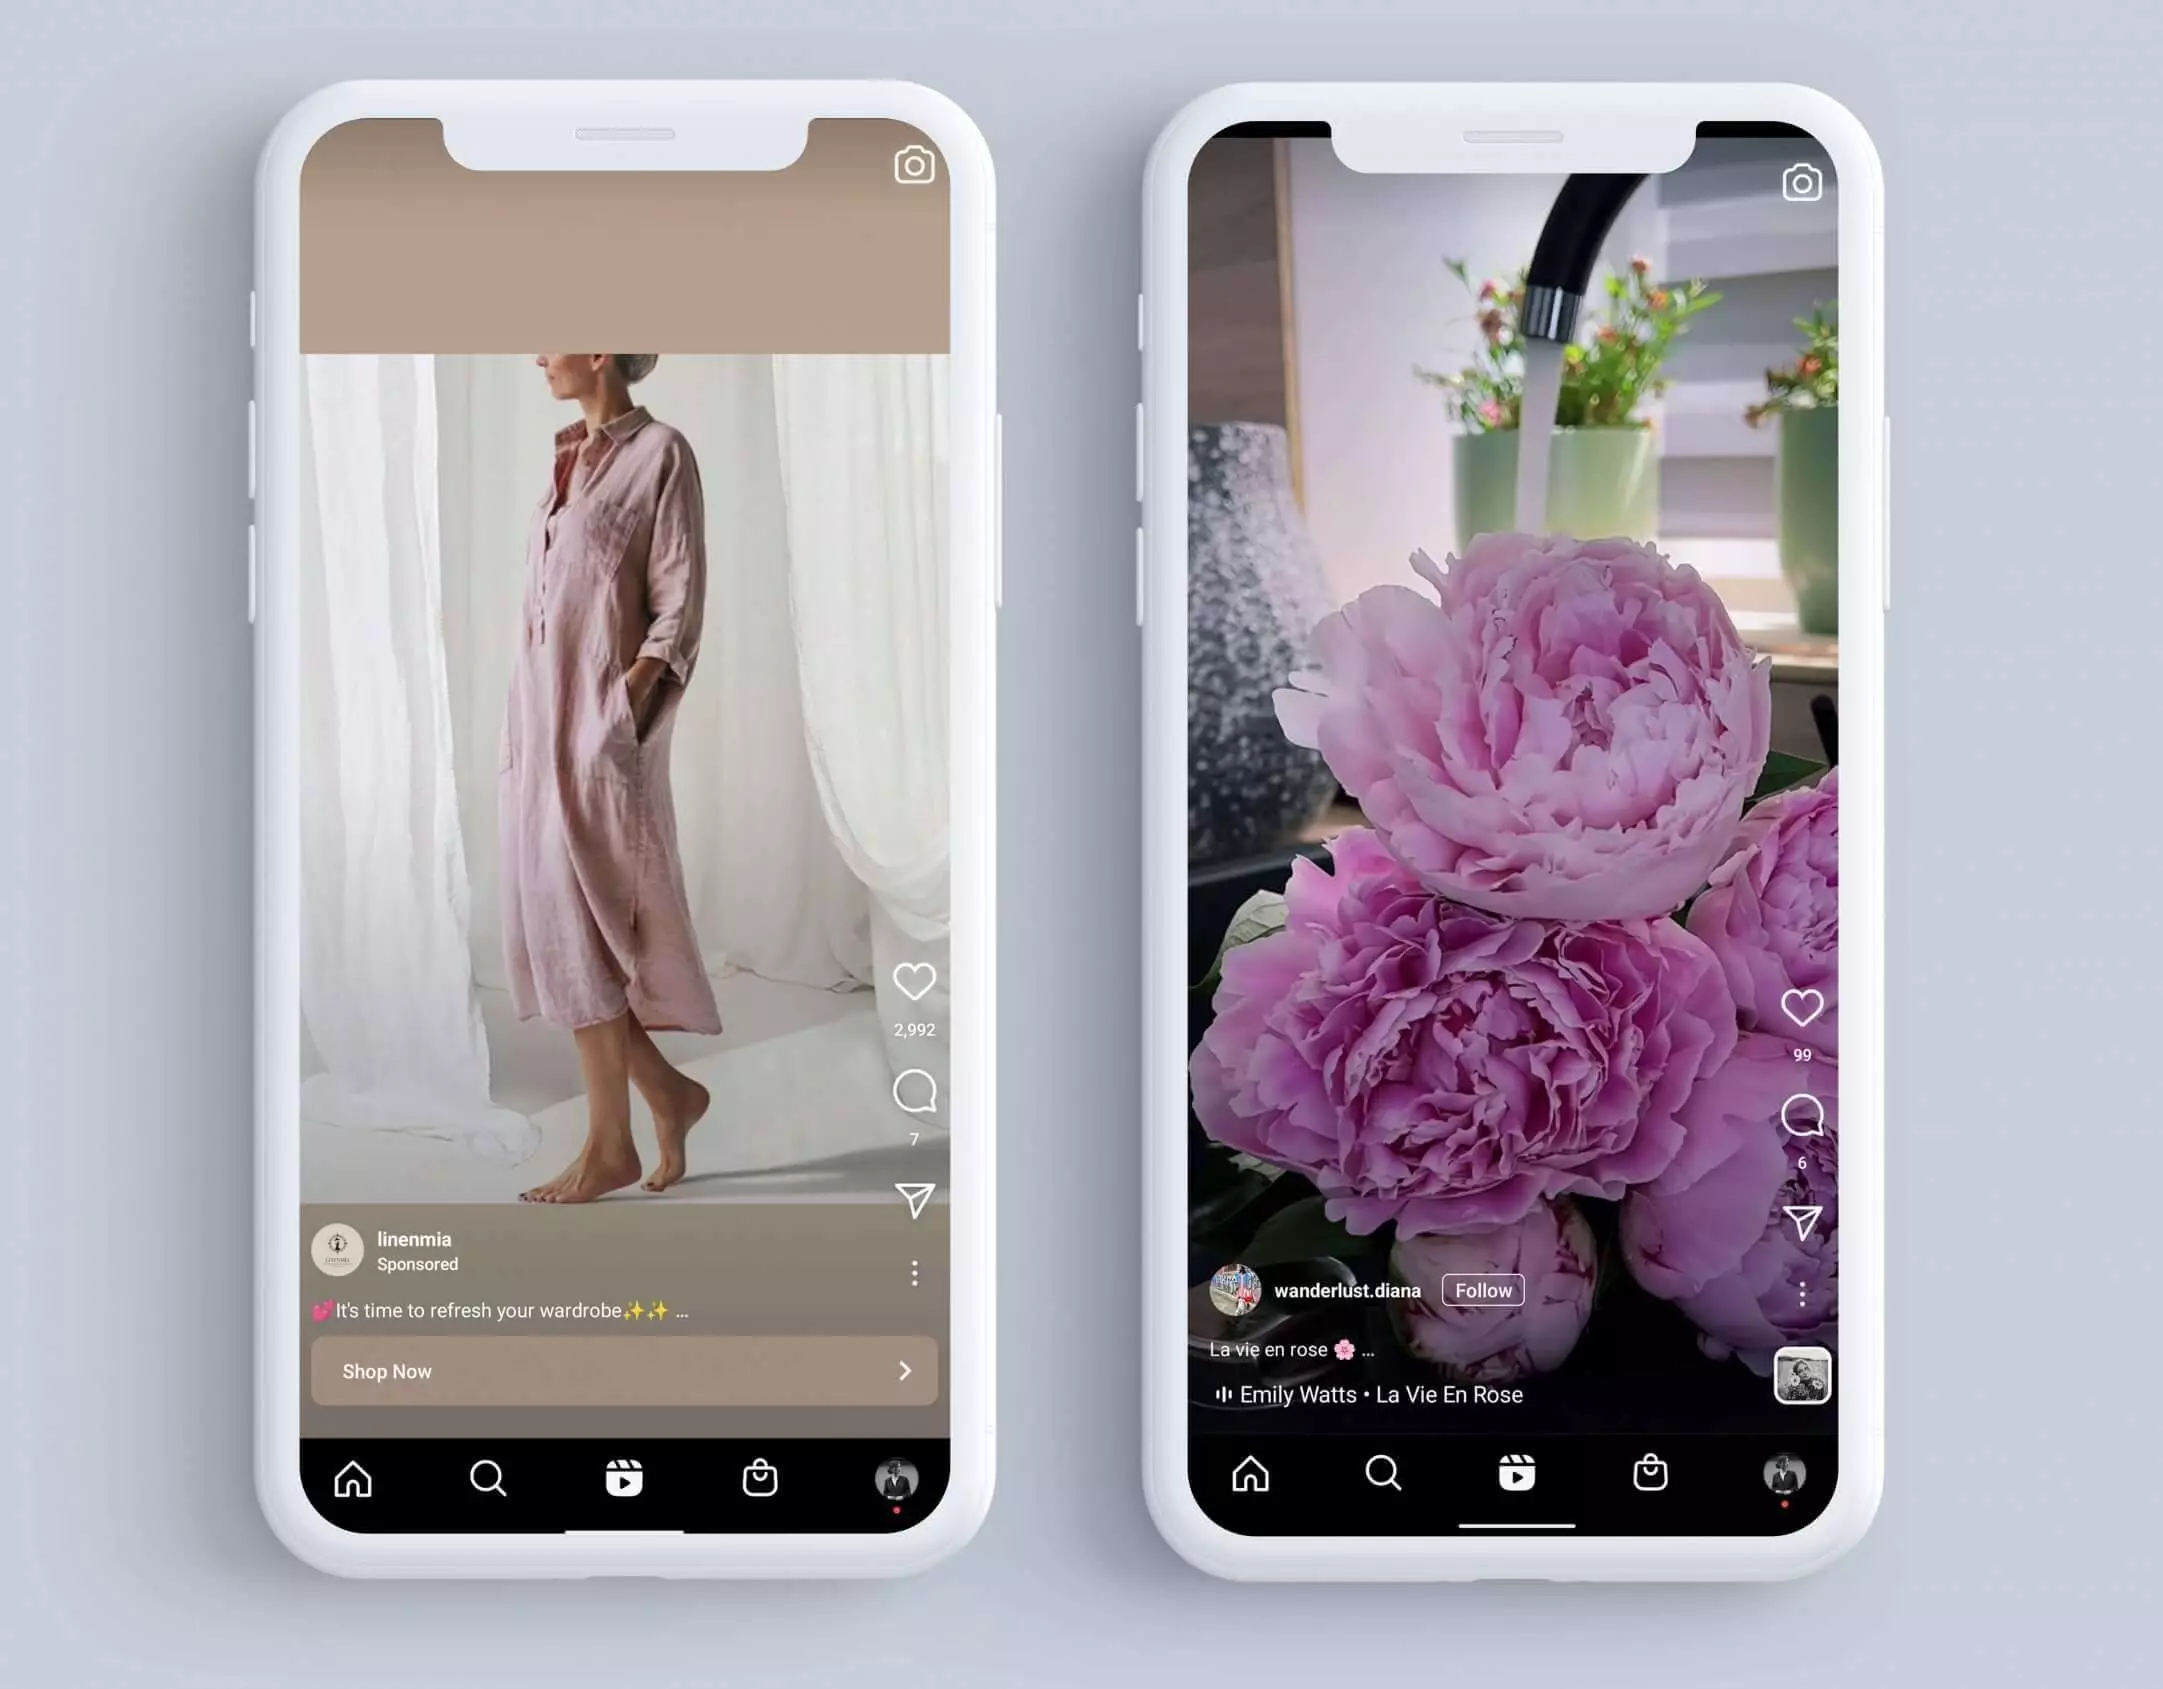
The Reels ratio is 9:16 or 1080 pixels x 1920 pixels or vertically full screen.
What is the in-feed ratio for Reels?
4:5 or 1080 X 1350 pixels or portrait.
What is the in-feed crop for Reels?
Crop the top 15%, and the bottom 15% off your Reels video.

Instagram Reels FAQs
What’s the best Instagram Reels Planner?
The best app to schedule Instagram Reels depends on your needs. If you only need to schedule Facebook and Instagram content, you can rely on Creator Studio or Facebook Business Suite.
On the other hand, if you’re looking to schedule content for more platforms and you need to collaborate with your team, a social media management tool like Planable will save you time and make your processes more efficient.
What are the best times to post Instagram Reels?
Each audience is different, so it’s important to check your Instagram insights and reels statistics to get an idea about your followers’ behavior.
Generally, the best time to post on Instagram reels is:
- early in the morning: between 6 am – 8 am
- mid-afternoon: between 2 pm – 4 pm
- in the evening: between 8 pm – 10 pm
How do you organize your Reels?
You can plan and organize your future Reels content in an editorial calendar like the one Planable offers. The calendar allows you to see everything at a glance and spot gaps in your planning. You can plan content across different platforms and add different approval layers before posts go live.
Schedule Your First Reel with Planable
Getting started is always the hardest! But creating and sharing IG Reels can help with visibility and business growth. Here are a few ideas to get you started:
- Create saveable content – when someone saves your Reel, it gives you a boost and signals that users love your content. Pro tip: encourage your followers to save your content so they can easily find it.
- Publish user-generated content – make your audience feel special by reposting what they’ve shared with you. It’s a win-win situation where you post content, and your followers get a shout-out.
- Share a quick tip – one of the best-performing types of Instagram Reels is sharing hacks, tips, behind the scene, or educational content. Be generous with the information and win your followers’ loyalty with valuable advice only you can share.
Read our full list of Instagram Reels ideas for even more inspiration.
BONUS Assets:
